Showing posts with label simple. Show all posts

Thursday, December 31, 2015

Quick Swiss Ham Bake

While this photo is not one of my best, this last minute 'throw together' dinner turned out so yummy that I just had to share it with all of you. This took minutes to throw together and can be altered to your liking. I used Swiss cheese but Gruyere would be perfect in this as well. Use ham, Canadian bacon or turkey bacon if you prefer. I used broccoli because my kids love it but spinach or any veggie you like can be added.

The trick is sauteing the white parts of a green onion, leek or a minced shallot and  then browning the ham. Meanwhile, you want to whisk your eggs very well with a splash of milk. Add your salt, pepper and seasoning (I used tarragon)
and then pour the eggs into your oven ready pan. Wait a minute, then push the eggs towards the center of the pan, working your way around once or twice till the eggs just start to set. Sprinkle on your grated cheese then pop it in a pre-heated oven at 450F for 8-13 minutes (depending on how many eggs you used).

Voila! Dinner is served.


Read more ...

Saturday, October 24, 2015

Twice Baked Sweet Potatoes with Maple Syrup and Sliced Almonds


These last few weeks I have come very close to throwing in the towel in regards to making dinner. It seems like every single one of us has has been sick with a cold that just won't quit. And just when I thought it was going to get better, it started back up again with Jack today. This never ending rotation of the yuckies has really  worn on my nerves as well as my body and mind. I am tired and cranky and forgetful, my already limited patience is running out and if I have to wipe one more runny nose or listen to crying for one more second I think I might go crazy.

Trying to get everyone healthy means extra time and care in regards to what goes into our bodies. I really try not to take antibiotics unless I have a very good reason to. I took Mona to the doctor a few days ago and after a few standard test and no answer to the cause of her high fever the doctor recommended antibiotics. I feel like sometimes this is a last resort or a grasping at straws for doctors. Maybe it's because so many people demand antibiotics as soon as the sniffles arrive in hopes of feeling better within the hour. Antibiotics take a couple of days to start working and by this time, most viruses will be fought off naturally by the body. So many people think that it is the antibiotics that cured them when actually, it was there bodies natural defenses.


So when my family gets sick I take the normal precautions and go to the doctor if needed but I really try to use common sense and remember that sometimes, just sometimes, antibiotics are (over) prescribed as a means of desperate measure, prophylacticly or just to give to demanding patients what they want. In this case, I just wasn't so sure that it was antibiotics that my child needed. Even the doctor said she probably just had a cold.  So this means finding natural ways to fight off colds and infections that really work and aren't hard to find. 

Extra garlic and fruit, NO dairy or processed foods, and drinking coconut water are a few of my  trusted battle weapons when I arm up against viruses and germs. 

Eating whole foods loaded with vitamins and nutrients is also very important for your body to fight off infections. 

Sounds easy enough right? Umm, yeah, not with 4 sick and cranky kids who are wanting and needing my attention constantly and me fighting off the crud as well. Thank goodness my mom bought me a Shark steam cleaner a few weeks ago so I can sanitize this huge snot bucket we call a home. Trying to make home made soups and healthy foods is a battle right now and having everyone push their plates away while crying is not very much motivation to keep trying. How much easier would it be to just serve a boxed or a frozen dinner every night?!  Of course then I would be up all night long feeling guilty about all of the crap that is loaded in pre-made foods and the complete lack of real vitamins.


I decided that instead of serving convenient yet nutritionally void foods to my family that I would compromise and make really simple meals that were loaded with as much vitamins as possible.


This dish can't be any easier or a bigger hit with my entire family. I love that I hardly have any prep work whatsoever and that my kids fight over who gets the biggest potato. The maple syrup and sliced almonds make this seem more of a treat than a healthy dinnerSweet Potatoes are a Super Food, one of the very healthiest vegetables you can eat. They're loaded with carotenoids, vitamin C, potassium, and fiber.


You Will Need:

4 medium sized Sweet Potatoes, scrubbed well
1/2 cup Pure Maple Syrup (not the sugary kind)
1/2 cup sliced almonds
1 teaspoon cinnamon
1/8 teaspoon salt


Pre-heat oven to 350F. Scrub potatoes under cool water, pat dry. Pierce several times with a fork so the steam can be released while cooking. Bake for about 40 minutes until fork pierces through easily.

Carefully remove from oven and let cool for a bit. Using a towel, carefully slice open the middle of the potato being careful not to go through the bottom. Using a spoon, scrape out as much of the flesh as you can while leaving a thin layer on the inside so the skin does not collapse. Reserve skins! 

Put the scooped out sweet potato into a medium sized bowl. Drizzle with Pure maple syrup and stir in cinnamon and salt. Combine well. 

Gently scoop the mixture back into the potato skins and sprinkle with almonds. Place back into oven and cook another 12-15 minutes until the almonds are golden brown.


Serve with a big salad or other green veggie.


What is your favorite way to stay healthy or get well?

Do you believe that natural remedies can work as well or better than medication?


Read more ...

Monday, October 19, 2015

Hunters Stew #SundaySupper


This stew has all the flavors you need to keep cozy and warm on the coldest of nights. You can easily substitute your favorite fall or winter veggies in this stew and be enjoying every spoonful of the rich, savory broth in about 30 minutes. 


This months Sunday Supper is all about budget friendly meals. With four kiddos in sports, preschool, college {!!!} , dance, art, chess club, cub scouts and baseball I'm all for budget friendly meals! Christmas budget anyone??? 

Thanks for hosting this month T.R. from Gluten-Free Crumbley and David from Cooking Chat!


Ground bison is a very low fat, low cholesterol substitution for ground beef and is actually more like ground turkey than ground beef nutritionally speaking. Bison is lower in fat than beef and lower in cholesterol than chicken, making it a healthy alternative to these more commonly consumed meats. Just remember that the low-fat content makes it easy to overcook bison. Compared to farm raised cows, bison are mainly free range meaning they are not injected with hormones and antibiotics and consume a natural diet while roaming freely. 


Butternut squash, brussel sprouts and beans are all fairly frugal pantry staples making this simple yet hearty stew a budget friendly supper. Bison is a bit more expensive than ground beef but well worth it when it comes to nutrition and taste. Tomato paste really adds an earthy and complex element when combined with the other ingredients in this stew requiring no additional herbs  or spices. Just a bit of salt and pepper.


On a side note, I'm trying my hand at  dark mood photography....... bear with me. Actually, it won't be a regular thing here on Simply Healthy Family as it's not my style but there is occasion where I'd like to create a "dark" mood as in this Hunters Stew. I obviously didn't do a stellar job on my first try but I'm a practice makes perfect kind of gal.


SERVES      8          TIME     30 MINUTES


You Will Need
A large cast iron enameled Dutch Oven
8 cups (2 quarts) Organic, free range chicken broth
1 pound ground bison1 large yellow onion, chopped
2 cups cooked white beans (cannellini or navy)
2 cups cubed butternut squash (1 small squash, I cheat and buy pre-chopped on this)
2 cups, smallish brussel sprouts, trimmed
1 heaping spoonful Organic tomato paste
1 tablespoon olive oilsalt and pepper to taste


Prepare all veggies ahead of time. Preheat Dutch oven over medium-high heat. Add olive oil. Add onion and sauté for 5-8 minutes. Add ground bison and cook till browned, 6-8 minutes lowering heat a bit if necessary. Add tomato paste and stir to combine. Pour in broth while scraping the bottom of the pot with a wooden or plastic spoon to remove browned bits.

Add squash, brussel sprouts, beans and salt, stir. Lower heat and cover. Simmer 15 minutes to warmed through. Add freshly cracked pepper to taste.


What are your families favorite Budget Friendly Meals?  Share!


Have you ever cooked with bison, elk or other wild game? 
Would you?


Sunday Supper MovementJoin the #SundaySupper conversation on twitter on Sunday! We tweet throughout the day and share recipes from all over the world. Our weekly chat starts at 7:00 pm ET. Follow the #SundaySupper hashtag and remember to include it in your tweets to join in the chat. To get more great Sunday Supper Recipes, visit our website or check out our Pinterest board.

Would you like to join the Sunday Supper Movement? It’s easy. You can sign up by clicking here: Sunday Supper Movement


    Scrumptious Mains (Breakfast and Dinner)


    Satisfying Sides


    Sweet Treats


    Sips, Spreads, and Snacks


    Read more ...

    Wednesday, September 30, 2015

    Bubble and Squeek: Brussels, Leeks and Ham


    Don't let leftovers get you down. Make this quick and delicious potato dish and they'll never know it was from stuff you already had in your fridge. They'll also never know it's healthy, brussel sprouts are hiding in this flavorful comfort food.


    Bubble and Squeak, in it's varying forms is the name for fried left-over vegetables from Sunday lunch. Traditionally, it would be eaten on a Monday for lunch or dinner with a fried egg, bacon, or meat leftovers. There is no specific recipe it is simply a way of using up whatever you have left from dinner. The main ingredient is mashed potatoes which is the 'glue'  holding all of the other veggies together and often, but not always cabbage.

    In Ireland, it is known as Colcannon and is made from mashed potatoes, cabbage or Kale and onion and similar to Bubble and Squeak as is Rumbled Thumps in Scotland.

    Bubble and squeak was a popular dish during World War II, as it was an easy way of using leftovers during a period of hardship and when most foods were rationed. The name comes from the bubble and squeak sounds that are made as the vegetables cook.


    PREP TIME   15 MINUTES  
    COOK TIME    30 MINUTES
    SERVES    4


    BUBBLE AND SQUEAK


    1 1/2 lbs (750 g) floury potatoes
    1/2 cup(125 ml/4fl oz) milk
    3 oz (90 g) butter
    14 oz.(450g) any combination of  chopped or shredded green vegetables 
    {cabbage, leek, brussel sprouts, kale, spinach}
    4 oz (110 g) bacon or ham
    1/2 cup (125 ml)  Gruyere cheese, shredded 
    salt and cracked pepper to taste (I use French Grey Sea Salt)


    Cut the potatoes into even-sized pieces and put them in a pan of cold water. Bring to a boil. Lower heat and simmer until tender, about 8-10 minutes, do not boil or the potatoes may break up and absorb water before they cook through. Drain thoroughly.


    Heat the milk in a pan. Add potatoes and half of the butter then mash with a fork until the mixture is smooth. Melt  half of the remaining butter in a large, heavy-based pan with a handle suitable for using in an oven. Cook the ham or bacon until just done. Add the green vegetables (I used brussels and white & light green part of leeks this time) and cook until they are just tender and cooked through. Add them to the potato and mix together with cheese. Season to taste with salt and cracked pepper.

    Melt remaining butter (yup, more butter) in pan and spoon in the potato mixture, smoothing off the top. Cook until the bottom is browned and crispy. Remove pan from the heat and place it under a preheated oven at 450 degrees F. Cook until the top is golden browned, about 12 minutes.

    Delicious served with a salad or an accompaniment to poached eggs.


    Wash brussel sprouts under cool water. Pat dry.


    I threw them in my food processor and shredded them.
    Brown the brussels and leeks over med-high heat in butter or a high-smoke point oil like grape seed.


    Cube potatoes into small pieces and place in salted, cool water into a shallow pan. 
    Bring to a gentle boil for 8-10 minutes. Drain.


    Now listen, these photos are from 2 different times I made this dish.
    The 1st time I mixed all my ingredients in a bowl and then placed them back into the shallow pan and reheated it on the stove and then placed it right into the preheated oven to brown on top.

    The 2nd time I used a casserole dish. Not sure why, maybe because I thought it would be prettier. I suggest using the same pan for everything if you have one that is oven proof. Cook your potatoes first, drain and set aside, then brown veggies. Then bake {just follow the recipe above}


     Bon Appetite!


    This post is linked to:
    Read more ...

    Friday, July 24, 2015

    Cast Iron Skillet, Sweet Chile Corn Bread


    Not another cornbread recipe you say. You're right. It's not. It's the best corn bread recipe ever. I'm confidant that way. Allright, it's all up for interpretation and personal preference but I for one prefer my cornbread sweet and slightly spicy and most importantly, not dry and crumbly. More of a corn 'pudding' but not exactly.


    Sweet and spicy. Is there a better combo ever created? I think not. My mom's cornbread was always served with home made honey butter and was a special treat to go with our beans and greens. My corn bread can stand alone super star style and be the star to any main dish you serve.

    Our favorites? Simple "Cowboy Beans, slow cooked in spices {What? I've not posted that one…. tbc} with sautéed kale drizzled in balsamic vinegar and maybe if your lucky, baked sweet potato fries.

    Or, Chile con carne. Of course.

    Orrrrrrrr, BBQ'd chicken and coleslaw comin' up!


    Whatever you serve this with, be prepared that this sweet chile cornbread will most definitely be the star.


    Make sure to enter my giveaway for a set of these cute cast iron skillets!
    One square, one oval. Today's the last day!


    Corn bread or cake? You decide.


    TIME      30 MINUTES        SERVES     8


    1 cup corn meal
    1 cup flour
    1/4 cup sugar
    3 teaspoons baking powder
    1/4 cup butter
    1 teaspoon baking soda
    2/3 cup plain yogurt
    1/4 cup creamed corn
    1/4 cup frozen corn
    *1 cup buttermilk
    2 eggs
    1/2 teaspoon salt
    1 (4 ounce) can mild green chilies (optional)


    Pre Heat oven to 375F

    Mix dry ingredients together in medium size bowl.

    In separate bowl, combine wet ingredients, stir to combine. 

    Lightly grease 10" skillet {or several individual skillets) with butter.

    Combine wet ingredients into dry, stirring just till combined. Pour batter into prepared skillet. 

    Bake at 375F for 25-30 minutes till lightly browned on top and toothpick comes out dry.


    Remove from oven, place on cooling rack. Serve warm.  


    notes:

    If your like me, store bought buttermilk usually goes to waste after I use it for the recipe intended for.
    Here's a super quick way to make your own. 

    1 cup whole milk + 1 tablespoon plain vinegar  
    Mix. let sit for 5-10 minutes. = home made buttermilk  


    Pairs well with:

    Cowboy beans and Greens. {should I post my recipe?}

    Grilled/BBQ'd Chicken and Apple Slaw

    Chilie of course!


    Read more ...

    Sunday, June 14, 2015

    DIY Mini Magnet Terrarium


    Happy Friday friends! I wish I could say that I have the weekend off but alas I'm headed in to work tomorrow to save lives one icky gallbladder at a time. Not a very glamorous job but at least it's near freezing in the operating room. Next week I have 5 days off starting on Wednesday and we are headed up to Northern Arizona to stay in my in-laws cabin. I can't wait to get out of this stinking heat! I seriously don't think I can make it to August, actually it doesn't really cool down until the very end of October here, ughh.


    I wanted to share this lovely DIY mini magnet terrarium with you. Easy to put together and a super cute and unique accent on your fridge. I know I would love to have these arranged on my fridge instead of clippings and doodles for a change.  Not that I don't love the kids doodles ;)


    DIY Mini Magnet Terrarium (via http://cladandcloth.com/)
    I’ve got some cool news!  I’ve been selected to create a DIY kit for Darby Smart!  I’m still working with them to create the kit but I’ll let you know as soon as it’s available.  In the meantime, I got a box just to see how it felt to open…


    Read more ...

    Thursday, April 23, 2015

    Tuna and White Bean Cakes with Shaved Spring Asparagus and a Light, Lemon Tarragon Sauce {gluten free}


    Question.  How do you make crab cakes when you're craving them like nobodies business but you   a.) don't have any crab and  b.) are on a budget? 

    Answer.  You doll up some tuna with fresh herbs, lemon and shaved asparagus, dip it by the forkful with no shame into a tangy lemon, tarragon yogurt sauce and wash it down with a glass of Pinot Grigio.


    Delima averted.


    Then, just to gloat, you tell yourself that you are being super health conscience because you ate a practically perfect meal by utilizing the antioxidants in the wine and gave your body a good dose of healthy Omega 3's which are hard to come by these days, thereby forgetting all about the fact that you aren't  in fact  having crab cakes.  Pssshhhh, who needs em?


    These tuna cakes are easy enough for a Monday night dinner -- or in my case a Tuesday night dinner. Tuesday's, without fail, are the crazy busiest Orthopedic days in surgery for some reason. Coincidentally (or not) it's also when people tend to call in sick, have some sort of emergency or just decide to spend the day soaking up the Spring sunshine (I would choose option 3 but I'm too chicken to make it happen).


    This particular Tuesday provided to be all of the above plus an added curve ball. Seeing as we were short staffed (more than usual) I didn't get to work with the Ortho Doc who I usually assist during Makoplasty surgeries. Instead, I ended up doing total hips and knees with a Dr. I hardly ever work with meaning I couldn't rely on my "Auto Pilot" and had to use my memory/mommy brain instead....  at least until my coffee kicked in.... around noon. Not good.


    My point,  I am mentally and physically and in all other ways exhausted on most every Tuesday. These tuna cakes are just a tad bit more complicate that spaghetti and meatballs or in our house, spaghetti and Italian sausage. You get the point. They are super easy to throw together.


    A few chopped veggies and herbs thrown in a bowl with an egg and a can of tuna and you have yourself a  not so  fancy meal.


    How can you not add asparagus to every meal during the Spring? Wait, am I the only one who worships this gorgeous veggie? No wonder since it's cousins are onion and garlic! 


    I pulse a bit more than half of the white beans in my food processor and reserve some to add texture. 
    Instead of using bread crumbs which you already know are high in gluten and cause bloating, stomach fat and various other ailments, I used finely chopped veggies and green onion and  nutritional yeast to bind the ingredients together. As you can see, they formed patties quite nicely.
    If I had to pick one one of my top 3 favorite kitchen tools, my stone baking pan would and will be on the list forever! It browns veggie patties quickly and evenly using NO added oil and cleans by scraping with a spatula and hot water. Good bye fryer! 


    {If you are at all interested in purchasing a stone baking sheet or any of my other favorite kitchen gadgets or ingredients, please consider buying through Simply Healthy Family's 'Store' and help support this blog. It's very much appreciated!} 


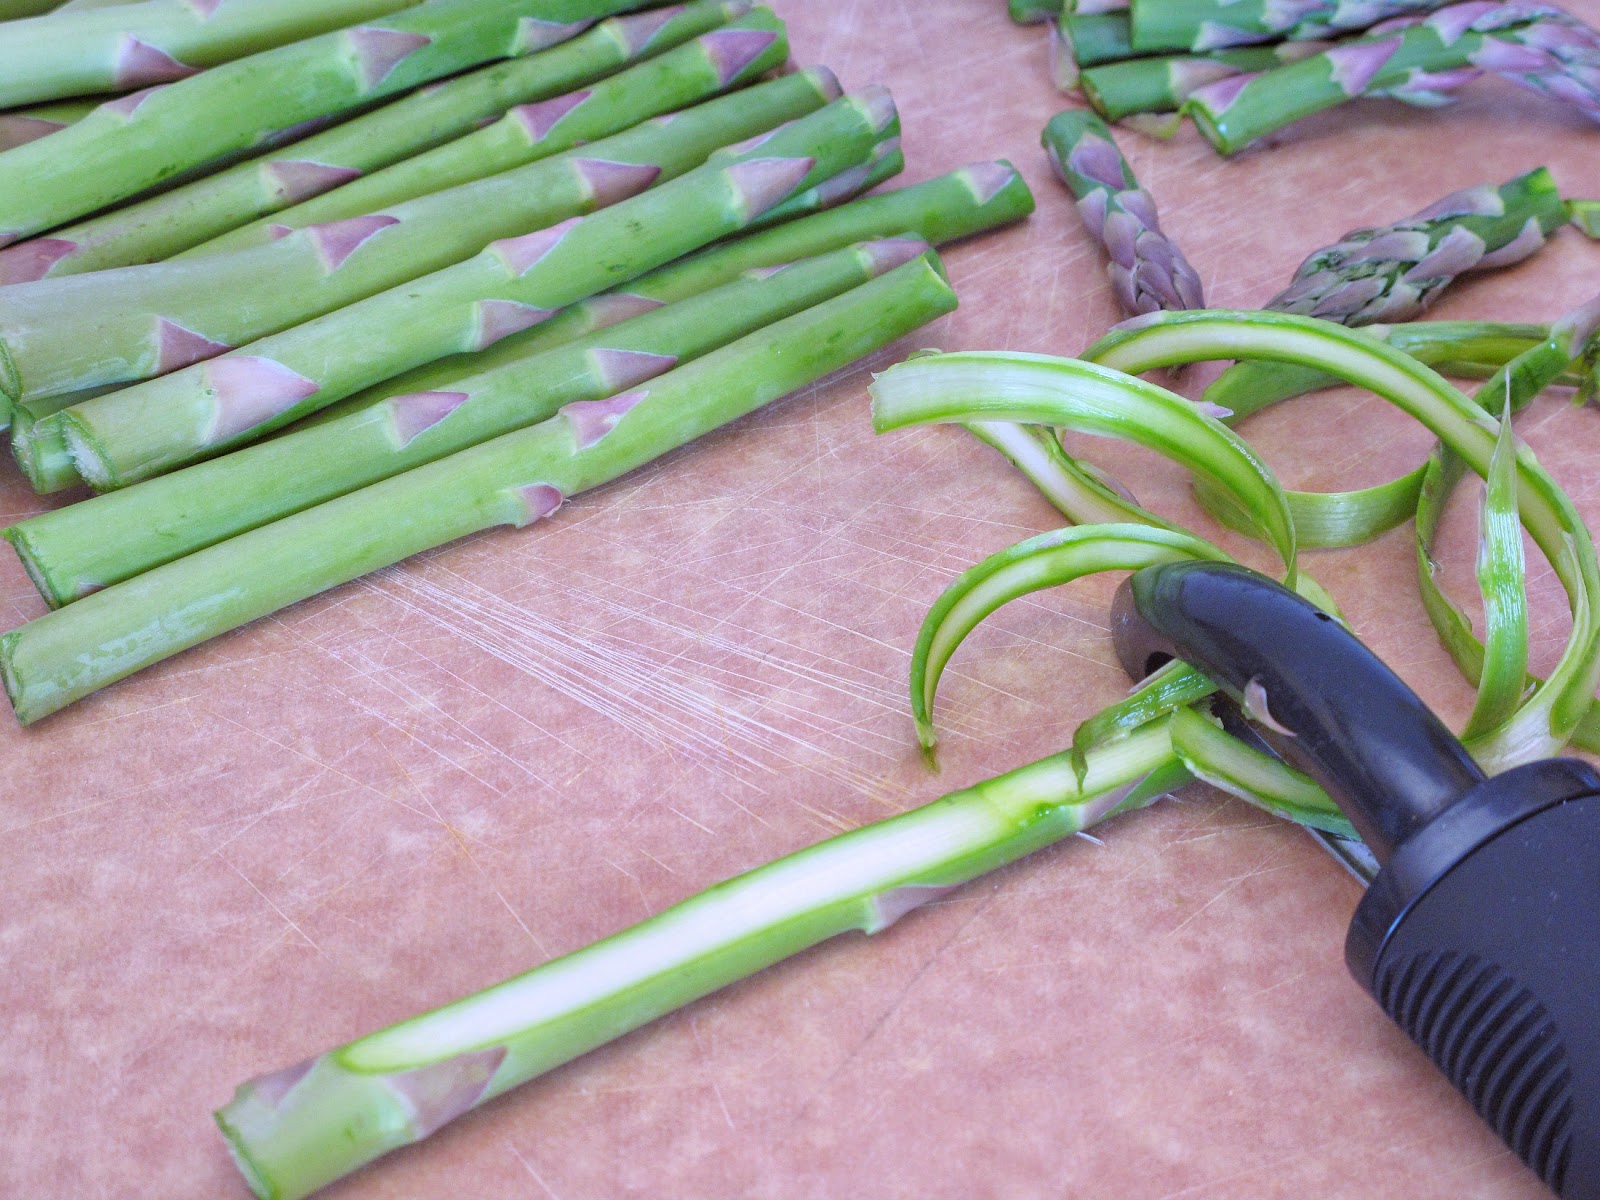
    Using a simple veggie peeler, shave thin strips of asparagus and pile on top of your cooked tuna cakes. There is no need to cook or even blanch the asparagus, it tastes amazing when shaved into such thin strips and pairs perfectly with these tuna cakes. In fact, I found myself nibbling on my pile of curled asparagus while admiring the beautiful purple and green of my favorite vegetable.

    Oh, you'll want to cut off the very tips of the asparagus, the spear, and save it for tomorrows salad or stir fry. The tips don't shave well but are conveniently most peoples favorite part.


    This light and tangy dressing is the key to these tuna cakes.  I must admit that however healthy and flavorful they are, tuna cakes as well as any other fish cake are a bit dry without some sort of sauce to jazz it up. It makes a mundane meal extraordinary.

    Crab cakes usually come with some version of aioli paired with them not only to compliment the flavors, but to add moisture. My tuna cakes are no exception. Instead of aioli, which base is mayo (if you know me, I can't stand mayo) I made a thick and creamy yogurt lemon-tarragon sauce to spoon on top of my cakes.  Not sure which I ate more of, the tuna cakes or the sauce.


    TIME    30 MINUTES        SERVES    4-6

    INGREDIENTS

    2, 6 oz cans of Chunk Light Tuna, drained

    1 cup cooked (or 1 can, drained and rinsed) cannellini beans

    1 lemon, juiced 

    2 eggs
    1/4 cup red bell pepper, finely diced
    2 tablespoons green onion, finely diced
    1/4 cup carrot, grated finely (optional, adds sweetness)
    2 tablespoons green onion, finely diced
     4 asparagus spears (tips removed and saved for future use) 
    2 tablespoons Nutritional Yeast
    1 tablespoon dried Tarragon
    salt and pepper to taste
     1 cup Greek yogurt 
    1 lemon (from above) zested
    1 tablespoon dried Tarragon
    pinch of sea salt


    Preheat oven to 400F
    In a food processor, pulse 3/4 of the beans until smooth. Spoon beans into a large bowl and add remaining whole beans. Add tuna, eggs, lemon, bell pepper, onion, nutritional yeast, tarragon, salt and pepper. Mix until thoroughly combined. 
    Using hands, shape mixture into small patties and place onto stone baking sheet or parchment lined cookie sheet.
    Bake at 400F for 10 minutes. Flip patties over and cook another5-7 minutes.
    Meanwhile, prepare lemon tarragon sauce by mixing all ingredients in a small bowl. 
    Shave asparagus as instructed above. 
    Remove tuna patties from oven and place on plate.  Dollop with lemon, tarragon sauce and top with shaved asparagus.

    Serve with a side of mixed Spring field greens and chilled Pinot Grigio.


    Read more ...

    Thursday, March 5, 2015

    Simple Drunken Shrimp Linguine {Wine Pairings and Oil tips}


    An insanely simple plate of drunken shrimp pasta is in order if you are feeling like you can't take one more second of the cold. I implore you to throw this pasta together and brighten your mood altogether.
    Shrimp is one of my favorite, decadent treats yet it couldn't be easier to prepare. Literally minutes.


    Fresh, raw shrimp is best but if you buy frozen shrimp, choose tail off, deveined large shrimp and make sure you remember to defrost them in the fridge for 24 hours before you cook them then pat them dry before sautéing. The frost on the shrimp won't allow them to cook properly, steaming them instead of sautéing.


    Linguine noodles soaked up the extra drunken tomato sauce and was slurp worthy. Not to worry, cooking the sauce makes this dish alcohol free but the taste one step above ordinary! I threw some finely chopped carrots into my sauce to sweeten it up a bit and balance out the boldness from the infused tomato sauce and the spiciness from the red chili flakes. Garlic of course was added in generous amounts rounding out this bold and hearty pasta.


    Wine Pairings

    Even though this sauce has bold flavors, if you are pairing with a wine, choose  either a light red such as a Pino Noir or Chianti. If your sauce is on the spicier side, stick with a Spanish or California Rose to avoid a metallic aftertaste you'll get from red wines or choose a white wine with light, balanced fruit notes such as a Pinot Grigio or Sauvignon Blanc which will really bring out the mild flavors of the shrimp.


    Ingredients

    1 10 oz package Linguine noodles, cooked according to package directions, al dente
    1 lb. large, raw tail off shrimp - deveined
    1, 32 oz. can petite diced tomatoes, un-drained
    1/4 cup good quality gold tequila {or red wine} broth or juice from tomatoes may be used 
    1/2 cup finely diced carrots
    6 cloves thinly sliced garlic
    1 shallot, minced
    1 tablespoon med-high smoke point oil: grape seed, palm oil, safflower, or avocado oil
    1 tablespoon real butter
    generous pinch of salt
    red pepper flakes to taste


    Have all of your ingredients prepped and ready to go!

    While pasta water is being brought to a boil, heat a large wok over medium-high heat. Add oil and butter, let it get fairly hot but do not burn butter. Add dried shrimp and carefully and quickly toss to coat. Let shrimp sit for 2 minutes, flip again to toss and let sit for 1-2 more minutes till pink.

    Add carrots, shallot and garlic to skillet, sprinkle with salt toss to combine. Cook 1 minute stirring so as not to burn shallot and garlic. Pour in tequila or other liquid you are using to deglaze the wok using a large, flat spoon to scrape brown bits of bottom of wok. Turn down heat to medium-low. Let sit for 2-3 minutes while liquid cooks down. Add tomatoes, stir to combine. Let simmer for 3-5 minutes till just warmed through. Remove from heat. Spoon over drained pasta.


    notes:

    Adding salt to the carrots and shallots at the beginning of sautéing will soften them and bring out their natural flavors adding to the sauce.


    Read more ...