Showing posts with label desserts. Show all posts

Sunday, December 6, 2015

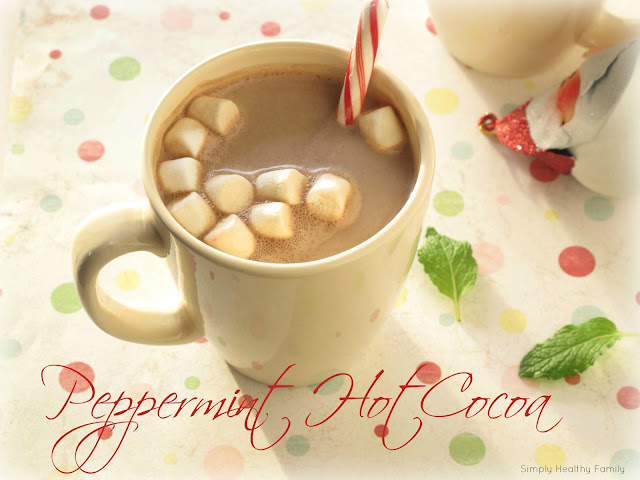
Reliving Old Holiday Traditions and Starting a Few New Ones: Peppermint Hot Cocoa


Traditions are what makes the Holidays so special and coming up with new traditions to celebrate with your family is even better. Every year when we were little we would have a cup of  hot  warm  cocoa with mini marsh mellows while we decorated the tree. I remember feeling so special while holding that cup of creamy sweet chocolate and watching with my brother and sisters as the tree slowly came to life. We were always in our footsy jamies, the red "Annie" ones were my favorite and we always put out a small plate of cookies for Santa by our fire place, a rarity in Phoenix to be enjoyed only once a year on Christmas Eve.


The expectations and anticipations of Christmas come flooding back to me now that I have 4 children of my own. I relish in living vicariously through their utter thrill of all of the magic of the Holidays. Keeping up with most of the traditions that mine and my husbands families enjoyed so much and cherishing the new ones our own little family have started.

Going to Cost Plus World Market every year and letting all of the kids and ourselves pick out one special ornament to hang on the tree is a tradition that we started many years ago with our children. This has proven to be such a treat as the kids bounce out of their slippers every year as we drag out the Christmas boxes and let them rifle through the ornaments finding the ones with their initials and the year marked on them that they chose them and then hanging them perfectly on the tree. I know that we will cherish those ornaments forever and ever.


Making the hot cocoa that literally defines Christmas in my humble opinion is another tradition we have stuck with. I however prefer to make it with a good quality cocoa powder and sucanat or turbinado (organic) sugar  instead of the boxed/packaged/overly processed variety and then adding a bit of pure peppermint extract and using a peppermint candy stick to stir up the chocolate that settles at the bottom of the cup. Mini marsh mellow are of course Absolutely, Positively  still  Required. After all a little bit of marsh mellowy goodness never hurt anybody.


Now, if you'll excuse me I'm going to start a very recent tradition and go sit out in our new bubbly hot jacuzzi. I love living here in the Arizona desert, 58F is the perfect temperature.


What are your Holiday traditions?


Peace, love and peppermint wishes from Simply Healthy Family.


Read more ...

Sunday, November 8, 2015

Pumpkin Cinnamon Rolls w Maple Icing in Parchment


I'VE never been a big fan of cinnamon rolls...........


Are you still with me? Do you still trust me? Think I'm off my rocker? 

Well, that's beside the point. What was the point? Oh yes! Cinnamon rolls. They are just so, so sweet. Too sweet in my opinion. I just feel sick after eating one, same with root beer floats I love them but just can't stomach them. poor me. These pumpkin rolls had just the right amount of sweetness to satisfy my sweet tooth with out all the gluttony and guilt. The maple syrup cream cheese frosting was really the sweet treat in these. 

Now if you add pumpkin to the mix, I'll eat anything ..... anything. Kind of like with meat and pork, I can't stand it but if you put it in Mexican food covered with a decent home made spicy red sauce, I'll eat a plate full. The point is, I love pumpkin. Stay with me.


So when I saw this recipe on My Baking Addiction adapted from King Arthur made by Good Life Eats..... well you get the point, it's been enjoyed around the block. I knew this is what I had to make for my friend Brandi who has been graciously helping me out all year by taking my son to school on my early morning work days. Thanks Brandi!


Oh! Instead of making these in a cake pan I used a muffin tin.  I cut squares of parchment paper into squares and then put the cut dough into the muffin pan. This made it easier and prettier to give as a gift I think.


Risen and ready for the oven.
pumpkin rolls in parchment


tip: pumpkin makes these rolls denser than regular cinnamon rolls so they are best right out of the oven or re-heated for a few seconds in the microwave. Also, cut the cooking time down by 5-8 minutes if you are using my muffin tin method. enjoy!


pumpkin cinnamon rolls w/ maple icing


Yield: 12 cinnamon rolls
Prep Time: 50 min + rising time
Cook Time: 30 min

You Will Need


DOUGH:4 Tablespoons salted butter, melted1/4 cup granulated white sugar1/2 teaspoon salt1 cup canned (unsweetened) pumpkin puree1 large egg, beaten1/2 cup lukewarm water (105 – 110 degrees F)1 packet active dry yeast1 Tablespoon granulated white sugar3 3/4 cups all-purpose flour, plus extra- as neededcooking spray 

FILLING:4 Tablespoons butter, at room temperature2/3 cup light brown sugar1 Tablespoon ground cinnamon1/4 teaspoon ground cloves1 teaspoon ground ginger1/8 teaspoon ground allspice1/8 teaspoon ground nutmeg1/4 teaspoon salt 

ICING:3 ounces cream cheese, at room temperature1 cup powdered sugar, sifted1/4 cup pure grade B maple syrup1/4 teaspoon salt

Directions:

1. Spray a non-reactive bowl with nonstick spray. Set aside. Line a 13x9x2-inch metal baking pan with parchment paper.
2. In a mixing bowl, whisk together first 5 ingredients of the dough (through egg) until well combined. Set aside.
3. In a small bowl, whisk together warm water, yeast and 1 Tablespoon sugar. Let sit for 5 minutes until the yeast is frothy and active. If after 5 minutes yeast does not appear active, discard the mixture and start over with a newer, fresher yeast packet.
4. Place flour in a large mixing bowl (or the bowl of a stand mixer). Add yeast mixture and pumpkin mixture to the flour. Stir until ingredients have incorporated into a dough. If using a stand mixer, attach a dough hook and knead on medium speed for 5 minutes. If kneading by hand, turn dough out onto a clean, lightly floured surface and knead for 8 to 10 minutes. The desired consistency of the dough should be soft and just slightly sticky. Add more flour as necessary throughout the kneading process until you achieve the proper consistency.
5. Form dough into a ball and transfer to the oiled bowl. Toss dough around in the bowl to coat all sides lightly with oil. Cover with oiled plastic wrap and a kitchen towel. Place in a warm, draft-free spot. Let the dough rise until nearly doubled, usually 1 to 1 1/2 hours.
6. Roll dough into a 16x10-inch rectangle on a large, lightly floured piece of parchment or waxed paper. While rolling out the dough, make sure it’s not sticking to the surface. Lift the dough and sprinkle flour underneath, as needed.
7. Spread a thin layer of butter over the dough, leaving a 1/2-inch border on all sides. In a small bowl, whisk together remaining filling ingredients. Sprinkle this mixture evenly over the butter. Roll dough into a tight spiral- jelly roll style- by rolling the 16-inch long edge closest to you over the filling. Continue rolling dough into a log until the opposite edge is on the bottom. Slice dough into 12 even pieces and arrange in the prepared baking dish cut-side up. Cover the pan with oiled plastic wrap and a kitchen towel. Let rolls rise for 30 minutes in a warm, draft-free area. They’ll get puffy and smash into each other as they rise. Preheat oven to 350 degrees F.
8. Remove towel and plastic wrap. Bake until tops and edges are golden and rolls are cooked through- 30 to 35 minutes. Remove from oven and place on a wire rack to cool for at least 20 minutes before icing.
9. Place a baking sheet over the dish of cinnamon rolls. Invert rolls onto the baking sheet and peel away parchment paper. Flip the rolls onto your choice of serving dish. Whisk together the icing ingredients until smooth, then spoon evenly over all of the cinnamon rolls, allowing it to dribble down the sides.

Tips:

*To create a warm, draft-free place for rising, use your oven… turn on the oven for 30 seconds, then turn it off, turn the light on, and place your bowl inside the very slightly warmed oven. It’s a great place for your dough to rise if your oven is not in use.
*Make-ahead tip: Once your cut cinnamon rolls are in the pan, you can wrap them with plastic wrap at this point and refrigerate them overnight. Take them out of the fridge and let them warm up in the morning (at room temperature) and do their rising. Then you can continue with baking.
*These are best the day they’re made, but they’re also good re-heated the following day.
*Cinnamon rolls store better when they’re kept together since the edges will dry out if separated.


Read more ...

Monday, October 26, 2015

Apple Cider & Pomegranate Popsicles {and a Give Away}


These naturally sweetened popsicles are a perfect early fall treat. We are loving the cooler weather here in The Valley of the Sun (by cooler I mean in the 90's) and sitting out on the back patio with one of these popsicles is a special after school treat for the boys. Little miss thinks that "Popsicles are the World's greatest of all foods ever!" I'll have to agree with her on this one.


With the overload of sweets and candy that seem to be everywhere in late October I am especially happy to give these to my kiddos for a special treat. Apple cider and pomegranate have lots of vitamins and antioxidants to fuel the bod.


I really loved the combination of sweet, spiced apple cider and 
mouth puckering tart pomegranate in these.


Zoko sent me one of their pop makers to trial and I gotta say, I'm very impressed! Not only can you pour just about any combination of flavors and ingredients in the Zoku including yogurts, fresh fruit and nuts and have a cold, sweet treat in less than 10 minutes but they don't come out freezer burned and rock hard like the popsicles I've made in the past. Totally cool.... get it....cool?  O.K. fine 80's humor aside these popsicles rock! ;}


Love the cute, modern design! What color would you choose?


Next on my list? Chocolate pops! Thanks goodness these freeze super fast for those last minute chocolate emergencies!
photo source: Kid Crave


You Will Need

1 cup vanilla almond milk (helps the pops to not be like an ice cube in texture)
1 cup apple cider
2 tablespoons real maple syrup (not the artificially flavored kind)
1/2 teaspoon real vanilla
dash of cinnamon
1/2 cup pomegranate juice

Pour the pomegranate into the Zoku maker and let sit 5-6 minutes
Blend the remaining ingredients in a blender till combined.
Using a small funnel, pour the apple mixture into the Zoku, on top of the now frozen pomegranate juice.
Wait another 5-6 minutes and watch as they freeze in front of your eyes on your countertop!


Give Away is for 1 triple Zoku pop maker (they also come in single and duo) in the color of your choice, a $49.95 value.
Winners must live in USA or Canada


a Rafflecopter giveaway


Read more ...

Wednesday, October 14, 2015

Ginger-Pear Popsicles


Have you ever heard of Seasonal Affective Disorder 'SAD'? According to the Mayo Clinic it is described as a very real condition which is a type of depression that occurs at the same time every year. Usually symptoms start in the fall and may continue into the winter months, sapping your energy and making you feel moody.

Usually people who are affected with this live in a part of the Country or World where there is less light during the day such as in Washington State or the East Coast here in the States. This being said, my husband is convinced he has SAD. He's not the type of guy to complain or even mention that he not feeling well and has 'jokingly' said he must have SAD when I ask him why he is so sullen lately. The fact that we live in Phoenix, Az., the Valley of the Sun makes it harder to wrap my head around the possibility that a native Zonie can have a condition that is primarily caused by a lack of light. (light therapy usually helps treat this condition).  Maybe a vacation to the Bahamas is in order! I've been feeling a bit moody or as I like to say "hormonally unstable" lately as well. Then again, I'm used to it. ;)


Maybe a V-K isn't possible right now but I'm pretty sure popsicles cheer up most everyone, right?
Who says popsicle season is over? IMHO it's the perfect time for a cold sweet treat especially when all of my favorite flavors are in season like pears, pumpkin and apples. Apple Pie popsicle anyone? Check back on Thursday for the recipe and a chance to win my new favorite toy, the Zoku Pop Maker. This cute little gadget is cord free and can freeze popsicles in about 5 minutes! Shazaaam!


Ginger Pear Popsicles


Simple ingredients: Fresh pears, ginger root, vanilla almond milk and honey.


Did you know that ginger is excellent for calming a sick tummy? If you or your kiddos have an upset tummy give them one of these popsicles, it will help with nausea. I wish I had thought of these
when I had morning sickness for months on end!


My favorite pear to snack on are Bosc's although they are slightly grainy and next time I won't use them in popsicles. As my 8 year old put it "It tastes like you put sand in these."

These are my other favorites:

Bartlett's  are the juiciest pears when eaten raw and, consequently, lose their shape when cooked, turning to pear-sauce quite easily with the briefest exposure to heat. They are perfect for making Pear Butter or any other recipe where you want the pears to fall apart when you cook them.

Anjou  pears have a mild flavor and a firm texture, while still being sweet and juicy.

Bosc  pears are crisp when raw and hold their shape beautifully when cooked. They have the best example of the soft, grainy texture associated with pears. They are easy to recognize by their brownish russet skin, classic pear shape, and heady pear aroma. Use them to make savaory dishes like Pork With Pears and Chiles and Bourbon-Glazed Pears, or in desserts like Upside-Down Pear Cake and Sparkling Pear Sorbet.

Asian  pears are super crunchy - more like crisp apples than other pears. They are great for eating raw, especially when sliced or diced into salads. They are so good raw, in fact, that people rarely cook Asian pears. If you have a glut of them, though, they work wonderfully in tarts and crisps, like this Asian Pear Crisp. 


Ingredients 
3 fresh pears (any kind should work)1 small piece of fresh ginger root (about the size of your thumb)1 cup vanilla almond milk1tablespoon local Organic honey1/2 teaspoon cinnamon1/4 teaspoon nutmeg1/8 teaspoon cardamom

Blend all ingredients in blender until smooth, NO ice! I used my Vitamix so I even included the seeds and skins on the pears. Pour the mixture into the Zoku Pop Maker. Set timer for 7 minutes and watch while your kids peer over the top and
 watch the Popsicles freeze before their eyes!


The Results?

Jack ~ 8 1/2 years old "They taste kind of like nothing"  He's my cynic  
Nolan ~ 7 years old   "They're delicious! They kind of taste like chocolate but not really. Next time can we have chocolate popsicles?" He's my little sweet tooth.  
Mona ~  4 years old   "Mmmmmmm, these are sooooooo goooooooood! They taste just like a popsicle!"  She's my baby. ;}

Bottom line? I loved them! They were very refreshing with just a hint of zing from the ginger and a touch of sweetness from the honey.  Next time I might add a bit more honey to appease the kids. Perfect for sitting out on the back patio during the fall months with a cool breeze. 


Don't forget to stop by on Thursday for my Apple Pie popsicle recipe and a chance to win a Zoku Pop Maker!


happy snacking!


Read more ...

Friday, October 9, 2015

Chocolate Hazelnut Chia Seed Pudding

I'm usually not hungry at all first thing in the morning, especially when I have to wake up at 5:00 a.m. for work. You'd think I'd be used to it after 15 years of waking up at the crack of dawn to get to work and getting up with the kids, but my body, more specifically my brain are still in snooze mode until around 10:00 a.m. 


So the last thing I want to do is add to my fragile state by trying to make breakfast for myself and 4 children.
In an effort to stay away from boxed cereal I have come up with a few breakfasts that require little or no effort.


This pudding falls into the zero effort category. It has just 3 ingredients and you simply chill it over night (or for at least 4 hours) and wake up to a chocolate pudding for breakfast! Nice huh? 


What are Chia Seeds?


Chia seeds come from the desert plant Salvia hispanica, a member of the mint family that grows abundantly in southern Mexico. 


Chia is very rich in omega-3 fatty acids, even more so than flax seeds.  And, unlike flax,  they do not have to be ground to make their nutrients available to the body.  Chia seeds also provide fiber (25 grams give you 6.9 grams of fiber) as well as calcium, phosphorus, magnesium, copper, iron, niacin, and zinc just to name a few.


When added to water and allowed to sit for 30 minutes, chia forms a gel. Researchers suggest that this reaction also takes place in the stomach, slowing the process by which digestive enzymes break down carbohydrates and convert them into sugar.


You can use any liquid you like for this pudding, some suggestions are:  almond milk, rice milk,  coconut milk and hemp milk. I have been staying away from soy milk because it is a GMO and some research suggests it may have harmful effects on your body and your hormones.


To make the pudding: 

Mix together 2 cups chocolate hazelnut milk with 1/2 cup chia seeds. Drizzle in about 3 tablespoons honey, preferably local, Organic honey. 
Let sit at room temperature for 5-10 minutes then refrigerate over night. 
You could probably eat this in as little as 1 hour after mixing buy I find that I like the consistency better after at least 6 hours.


You could definitely have this chocolate hazelnut pudding as a dessert but I suggest adding a bit more honey. Also, since chia seed is so high in protein I like this for a breakfast treat. The consistancy of this pudding is very similar to tapioca but without all the sugar.


Please head over to Mom on Time Out and vote for my recipe!

This post is linked to:

Iron Chef Mom: Chocolate Edition
Tasty Tuesdays
Just another Meatless Monday


sources:

Dr. Weil dot com
Read more ...

Thursday, September 24, 2015

Guest Post from Dish by Trish: Grape Ambrosia Salad with Toasted Almonds


My long time blogging friend Trish, from Dish by Trish was kind enough to help me out with a guest post while we are getting all moved into our new home across the valley. This has proven to be quite the challenge with 4 kids and all of the junk we have accumulated over the years, and I'm not one to keep or collect anything so it confounds me how much crap we have! Time to simplify things! Nothing like moving to make yourself get ultra organized, super fast!


Welcome Trish who is a holistic health coach, dietitian and cooking instructor. Her site features meatless meals that are out of this world. She was recently featured on Dr. Oz and won the calorie cutting contest! Congrats Trish!


Ever year, my family would gather at my godparents' house on Christmas Eve. Aunts, uncles, grandparents, cousins, the whole gang. I distinctly remember cracking walnuts and opening roasted chestnuts in their dim living room next to the warm, decorated fireplace. My sisters and I would congregate in my godmother's walk-in closet and try on her furs, jewelry and high heels in secret, and then walk around her bedroom impersonating older female family members.


And I'll never forget that fluffy, heavenly bowl of sweetness sitting on the kitchen table that my godmother prepared every year. This marshmallowy gooey mess (aka ambrosia) always put on a smile on my face.


This recipe is a tribute to my dear godmother, Marie.


It's a modern, healthier rendition of ambrosia. It's not gooey or as fluffy as the traditional ambrosia but it's no less delicious. Hope you like it.


A couple of notes:

  • If you're using frozen pineapples, be sure to defrost them in advance. Also, chop the pineapple chunks into smaller pieces. I don't recommend pulsing them in a food processor (like I did) because it draws too much water out of them.
  • I added both red and green grapes for optimal color because the dish can lack color. I recommend adding 3/4 cup green grapes and 1/4 cup red grapes. The red grapes can be a bit astringent which is why I added less.
  • If you'd like, you can use sour cream instead of Greek yogurt, but I don't recommend using just plain yogurt due to its higher water content.
  • I tried using honey and the taste was just not the same. Feel free to use other sweeteners but if you prefer using honey I recommend halving it with another sweetener because the honey flavor can be overpowering.


Grape Ambrosia with Toasted Almonds


16 ounces frozen (unsweetened) pineapple chunks, thawed and chopped

3/4 cup flaked coconut, unsweetened

1 cup fresh seedless grapes, halved or quartered

2/3 cup Greek yogurt, nonfat

3 tablespoons sugar

1 ounce sliced almonds, toasted (optional)


In a large bowl, combine pineapples, coconut and grapes. Add yogurt and sugar and mix well. Chill for 30 minutes before serving. Top with toasted almonds and drizzle with honey, if needed.


Serves 5-6.


Nutrition Facts: Calories 261; Fat 5g; Sat Fat 5g; Chol 0mg; Sodium 57mg; Carb 54g; Fiber 2g; Protein 3g.


Read more ...

Tuesday, September 15, 2015

Lazy Black Berry-Peach 'Pie'


It pains me to finally get around to posting this recipe at the very end of summer. I hope it doesn't get skipped over by people who are over seeing peach recipes. My mom made this for us a couple of times while she was living here with us and I've made it twice with the intent of getting some great pic's of the finished product so I can share it with all of you. Unfortunately, this is one of those recipes that doesn't last long enough for me to set it on the counter and take pictures of it.

I could blame it completely on my 4 hungry children but in all honesty, the smell is just so divine that I can't help but scoop out seeping hot spoonfuls of freshly baked peaches and oozy blackberries into my dish as soon as it's out of the oven.

My mom's recipe calls this "Lazy Peach Pie" but it's really more of a cobbler I think. Whatever you call it, the preparation is so crazy simple that even I don't mind baking it for a last minute delicious dessert. Even though peaches are a summer fruit, you can really stick to the theme of being 'Lazy' and buy frozen or even canned peaches to throw into this pie during the Fall and Winter months. I can just picture cuddling in a thick quilt with a piping hot bowl of this pie with a bit of cream poured over top.


Making the batter is as simple as 1...2....3.
Then, fold in your peaches be they fresh, frozen or canned.


Pour into your baking dish.


Sprinkle some black berries over the top. I had about twice this much before a very curious 2 year old grabbed the cup of berries sitting on the counter and dumped half of them on the floor. 
Sabotage I tell you!


Bake for 45 minutes and enjoy the smell.


RECIPE FOR LAZY BLACK BERRY-PEACH PIE

SERVES  6        TIME 1 HOUR

You Will Need:

1/2 cup butter, softened
1 cup turbinado (raw) sugar
1 cup flour, preferably white, whole wheat
2 tsp baking powder
1/4 teaspoon salt
1/2 teaspoon cinnamon
1 teaspoon real vanilla
1 cup milk
2 cups fruit


Directions:

Cream butter and sugar. Sift together dry ingredients, add alternately with milk to butter mixture.
Fold in fruit. Pour into baking dish. Top with berries.
Bake at 375F deg. for 45 minutes until a toothpick comes out clean.
Scoop into bowls and pour a bit of cream over top if you wish.


Read more ...

Saturday, July 25, 2015

Soft Ginger-Lemon Cookies with Lemon Glaze


These cookies are fuss free deliciousness. I am in love with all things ginger and cookies and treats are no exception. There are those who crave things sweet and sugary, those who crave things salty or spicy and then there are people like me who like all things sour, zingy, tart and tangy. I also, equally love anything hot and spicy and seriously considered putting a pinch of cayenne in these.  ;) 

Alas, they are just perfect the way they are and I am in love with the super tangy lemon glaze! My mouth is watering in anticipation of a fourth second Lemony, ginger cookie.


recipe from Taste of Home


TIME  25 MINUTES      YIELDS 2 DOZEN
Ingredients:
1/2 cup butter, softened

1 cup packed brown sugar

1 egg

3 tablespoons sour cream

1/2 teaspoon lemon extract ( I used 1 tablespoon fresh lemon juice)

1/2 teaspoon vanilla extract

1-3/4 cups all-purpose flour

1 teaspoon baking soda

1 teaspoon cream of tartar

1 teaspoon ground ginger

1/4 teaspoon salt

Directions

In a large bowl, cream butter and brown sugar until light and fluffy. Beat in the egg, sour cream and extracts. Combine the flour, baking soda, cream of tartar, ginger and salt; gradually add to creamed mixture and mix well.

Drop by rounded teaspoonfuls 2 in. apart onto ungreased baking sheets (I used a sheet of parchment paper on my cookie sheet). Bake at 350° for 12-15 minutes or until lightly browned. Immediately remove from pans to wire racks. Yield: 2 dozen.


For the lemon glaze (not from Taste of Home)

1 cup confectioners sugar (powdered sugar)
1-2 tablespoons fresh lemon juice
lemon zest

Using an electric mixer on high speed, combine sugar and juice till smooth. Top with a bit of lemon zest.


Read more ...

Friday, July 3, 2015

Banana Split Popsicles {sugar free & healthy}


Inspiration for today's post comes from the fact that is 113F out and getting. even. hotter. The fact that it doesn't rain here in Phoenix makes me wonder how the hell so many idiots people decided to make this their home. It's a mystery..... and I'm Native..... idiot.


To make matters even more miserable, I work in the Operating Room aka meat locker (that didn't come out right). Meaning that we keep the AC around 59F-62F at all times and complain when it reaches 66.7F.  We are a strange group us medical people. So when I leave the perfectly normal frigid temps of the O.R. and walk outside into the blinding desert sun (no windows in surgery, could be an apocalypse and we'd never know) my internal body temperature starts to boil in exactly 13.2 seconds. Which is exactly how long it takes me to get to my car, open the door and step right into HELL, at 125+ degrees F.


Leather seats, wearing shorts, with no window shade, no parking garage, in Phoenix, in July. I'm all kinds of smart.


Eating a Banana Split on a stick = Very, very smart.


What I do have going for me are Popsicles. Granted I've seriously considered rubbing them all over my overheated face and body on more than one occasion. Desperate times, desperate measures.

Typically, light and fruity Popsicles or even frozen fruit are our only source of snacking and desserts here during the summer months but seeing as that it's a Major Holiday in July I decided to step dessert up a level.


What's even better than a big Ooooey Goooey Banana Split? A Banana Split that is combined together, layer by layer and then frozen on a stick to slowly enjoy while you sit waist deep in your pebble tech, salt water pool. With your big, ridiculous floppy hat of course.


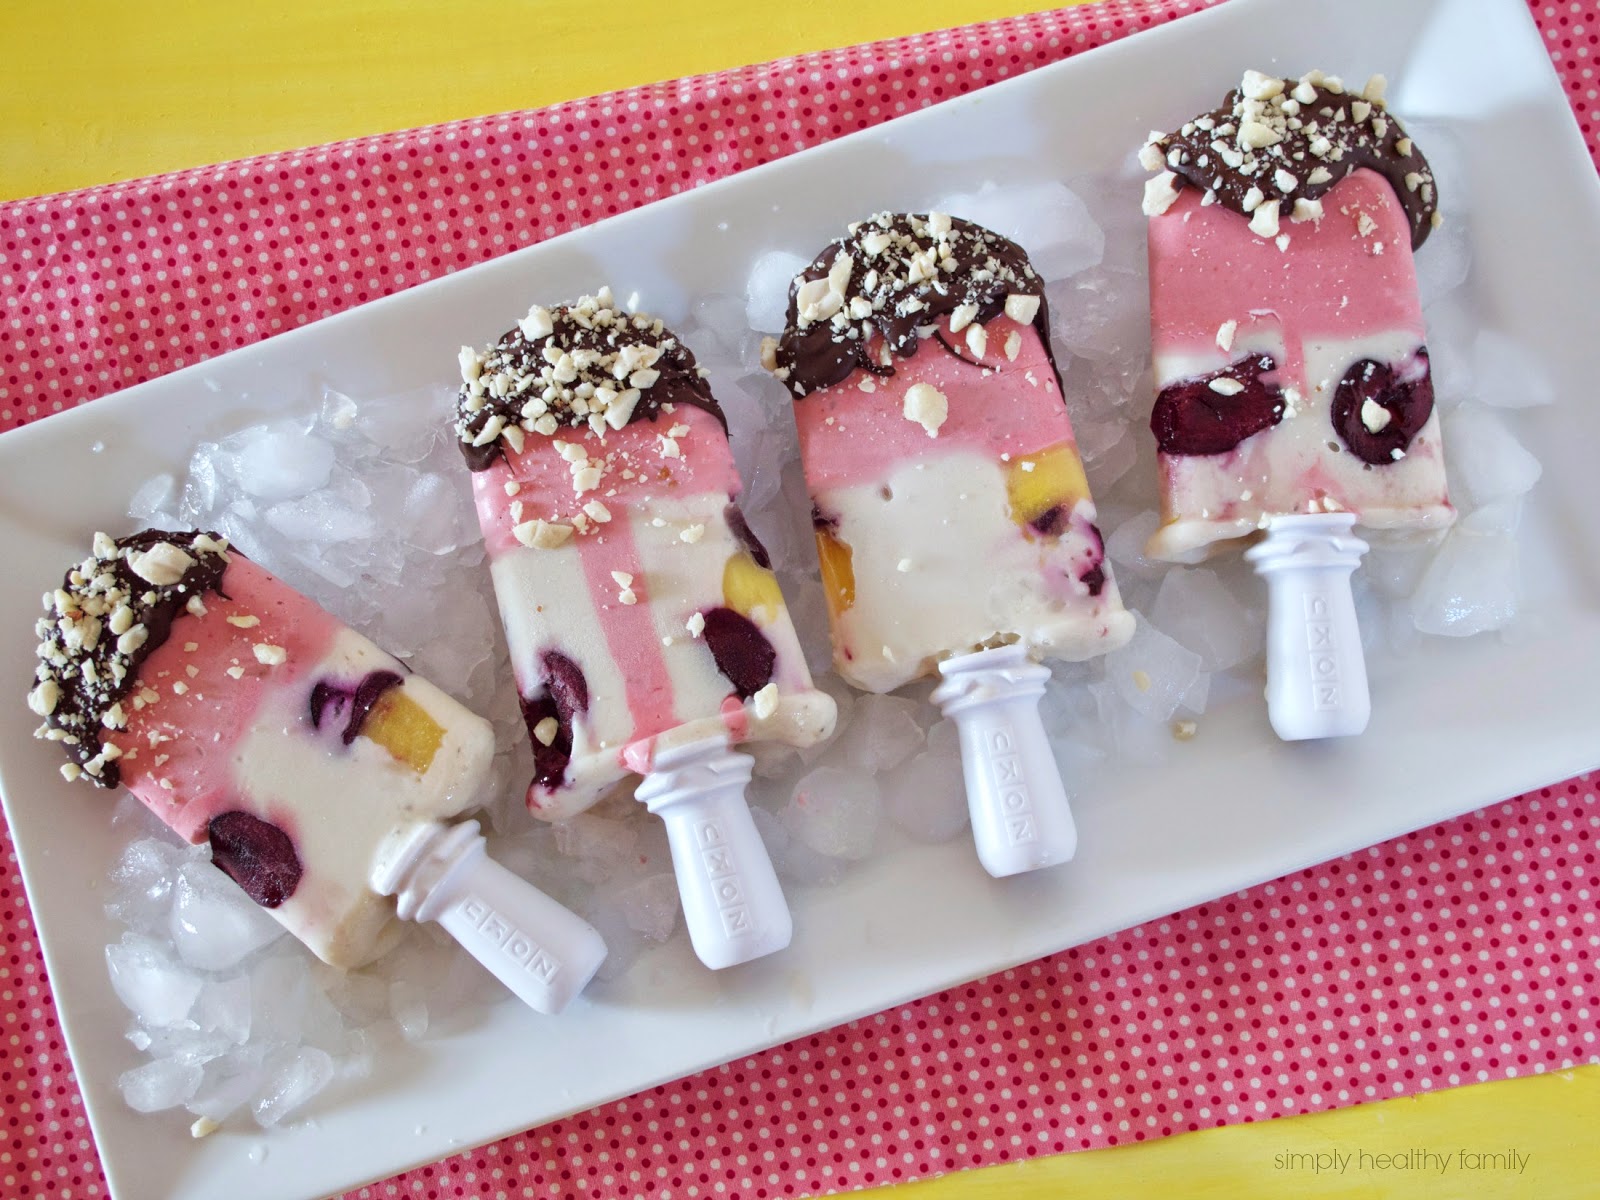
Strawberry, coconut puree, frozen bananas blended with vanilla almond milk and fresh cherries and pineapple in every bite. Drizzle with chocolate and sprinkle with chopped peanuts. 
Summer just got better. 


I learned a few things while making these Banana Split Popsicles,


  1. Making and attempting to photograph popsicles in July in Phoenix is a feat worthy of serious admiration. 
  2. Banana Splits in popsicle form are sheer genius that you can eat single handedly while sitting in the pool, no spoon required.
  3. I need a cherry pitter thingy-ma-jig.
  4. My mom just called me a lazy bum because I want a cherry pitter thingy-ma-jig. She's mean. 
  5. It's perfectly acceptable to dip fresh cherries and pineapple into melted chocolate before dinner while you are waiting 3-5 minutes in between popsicle layers to freeze. 


You will need

A ZOKU popsicle maker or other popsicle mold
2 cups fresh strawberries, greens removed, or not (I leave them on, lots of nutrients!)
1/2 cup coconut milk (in a can)
* tablespoon monk fruit in the raw
2 fresh bananas
1/2 cup vanilla (or plain) almond milk)
*1 tablespoon monk fruit in the raw
1 handful fresh cherries, pitted and cut in half
1 handful of pineapple tidbits
1 cup semi sweet chocolate, melted
1/2 cup chopped peanuts


To Make

In a blender, combine strawberries, coconut milk and monk fruit in the raw. Blend until smooth. Carefully pour into popsicle molds 1/4 deep. If using a ZOKU, wait 3 minutes till frozen then pour in the banana mixture. If using old fashioned popsicle molds, put in freezer until frozen, about 2 hours.
Rinse out strawberry puree from blender and then add bananas, almond milk and monk fruit in the raw. Blend until smooth. Drop a few cherries and pineapple tidbits into popsicle molds then carefully pour in banana mixture. If using a ZOKU, let freeze for a few minutes then remove and drizzle melted chocolate on top and sprinkle with chopped nuts. 


Need some more summer worthy snacks? I've seen some pretty delicious and perfectly picnic/4th of July worthy recipes from my blogging buddies such as:


Boozy (or not) Watermelon Stars


Red White and Blueberry Yogurt Pops from The View from the Great Island


Something super simple


These Fire Cracker Berry Margarita Floats from Half Baked Harvest!


And of course PIE! I know Apple Pie is an American Symbol of summer and picnics and even the 4th of July but I happen to l.o.v.e.  home made Cherry Pie the most.


Loaded Cherry Pie from Joanna at Eats Well with Others


Read more ...