Showing posts with label eggs. Show all posts

Thursday, December 31, 2015

Quick Swiss Ham Bake

While this photo is not one of my best, this last minute 'throw together' dinner turned out so yummy that I just had to share it with all of you. This took minutes to throw together and can be altered to your liking. I used Swiss cheese but Gruyere would be perfect in this as well. Use ham, Canadian bacon or turkey bacon if you prefer. I used broccoli because my kids love it but spinach or any veggie you like can be added.

The trick is sauteing the white parts of a green onion, leek or a minced shallot and  then browning the ham. Meanwhile, you want to whisk your eggs very well with a splash of milk. Add your salt, pepper and seasoning (I used tarragon)
and then pour the eggs into your oven ready pan. Wait a minute, then push the eggs towards the center of the pan, working your way around once or twice till the eggs just start to set. Sprinkle on your grated cheese then pop it in a pre-heated oven at 450F for 8-13 minutes (depending on how many eggs you used).

Voila! Dinner is served.


Read more ...

Wednesday, November 25, 2015

Simple and Sweet Holliday Corn Pudding {Cook the Books}


It's T-Minus errr a few days until Thanksgiving Day. I'm in charge of bringing a side dish to my family's dinner table. Parents, sisters, brothers, nieces and nephews, we have a blessedly large family. What to bring?

Quite honestly, I could bring a bowl of buttered mashed potatoes or a green bean casserole and everyone would be happy as a clam, except for me of course. I'm not sure when, where or how I became so obsessed  captivated and bewitched with cooking in general and then, true to follow, somewhere along the lines it became expected that I bring something interesting,  different  and amazing all at the same time to the table (I'm sure it's all in my head). On the flip side, I have been known to overcompensate and make a concoction  mélange  of flavors and spices that have received a raised eyebrow or two from less adventurous folk. The poor, unadventurous souls. 

I stick to my principals. Over spiced at times however they may be.  (T-Day 2009 had obviously left some scars on my ego.)   eghhemm  moving on shall we?


So.  I shall bring them……….


Holiday Corn Pudding!!!


"Da da daaaaaaa"  

Someone please tell me what movie this came from!!! Planet of the Apes? Star Trek?  Gahh!


Moving on.


Super simple and naturally sweet with a deliciously creamy and cheesy center. That's what I'll bring to the table this year. Sweet is my middle name just so you know.

It could happen.


Anyhoo,  My talented and ambitious friend, Heather from GirliChef  hosts a fun book club every month called "Cook the Books" I've been a fan for years actually but this is my very first time contributing.  (Book Clubs scare me.)

However, when I found out that

a.) This months featured book was from one of my long time favorite authors, Barbara Kingsolver

and

b.) All I had to do was make/bake/create a recipe from her book "Animal Vegetable Mineral" I dove in head first!


In her first non-fiction book, Kingsolver writes of her family's move from Tuscon, Az. (I'm a native Zonie) to her husband's inherited farm in the rural Appalachian Mountains. While this book received some criticism for not being a "realistic" alternative for most lazy Americans, I found it interesting and took it for what it was intended for, A woman's journey and struggles to find a way to live life simply and gratefully. I will not go into the critical masses remarks about how this book is so far fetched because her children didn't rebel due to the lack of Orios and processed foods and how they should have been "embarrassed" to bring their friends over to their home due to the lack of Coke in the fridge.

Furthermore, I wasn't offended as some readers seem to have been with this book but instead took what I could from it and found it intriguing how each of us handles change differently, views the importance of food and fortune differently and accepts those differences with either grace or with malice and fear.


The fun part! Picking a recipe from the book "Animal Vegetable Mineral" 

I went with a seasonal recipe, true to the book and made Kingsolver's "Holiday Corn Pudding"
According to her, "It's so simple a 9 year old can do it."  It was. In fact, my 4 year old did most of the work which was primarily dumping the small list of ingredients into a bowl and mixing. 

As you can see above, I chose to pour my corn pudding into small, individual ramekins for a fun presentation and a creamier pudding. If you do this, you will need to place them into a baking dish with water filled to about 1/2 way up the ramekins. This will prevent them from drying out before they are cooked through. I suggest putting the filled ramekins into the baking dish and then pouring water into the dish so as not to over fill.

Trial and error my friends.


PREP TIME    10 MINUTES
BAKE TIME   45-60 MINUTES
SERVES          6


Ingredients:

2 cans sweet corn
1 cup milk
1 cup grated Gouda cheese (or similar variety)
2 eggs, beaten
1 tablespoon marjoram (thyme or tarragon would work as well)
2 tablespoons dried parsley
salt and pepper to taste
{I added a big pinch of cayenne for a bit of heat}
butter to grease baking dish


Preheat oven to 350F  
Coat a baking dish or ramekins with real butter
Beat eggs. Add milk, beat to combine. Add the remaining ingredients and stir to combine.  
Pour into prepared dish.

If using ramekins, bake for about 60 minutes in a bath of water as described above until puffed at top and lightly browned.
If baking in a casserole dish, bake for 45 minutes or until puffed at top and lightly browned.


cookthebooks


Read more ...

Friday, November 13, 2015

Fancy Pants Eggs with Pizza Pie Crust

 I know not all of my posts or recipes are as fancy as some of the ones out there, but you can always count on them being good for you and pretty simple to prepare. That's the name of the game here at Simply Healthy Family. I do try to mix it up a bit with some recipes that have unique flavours and ingredients but I try to keep it as simple as possible for the average person.  I hate to say it, but if I can make home made snacks and meals with 4 kids running around and on a limited budget, you can totally do it! Just keep checking in here for simple family friendly ideas!
Here is another super simple, uber healthy ( as my teenager would say) breakfast ( or dinner! ) you can be proud of.  My 5 year old named this dish. ;)


Fancy Pants Eggs with Pizza Pie Crust


For the eggs:
Really, you can use any veggies you'd like. This is how we like our fancy pants eggs.

eggs + 1 tablespoon milk or water
fresh spinach, chopped
Bella mushrooms, chopped
sun dried tomatoes ( not in oil) chopped
shallot, minced
Canadian bacon, chopped
1 teaspoon real butter
Grated Parmigiana-Romano cheese

Beat eggs ( how many ever you need to feed you or your family) with a tablespoon of milk or water.
In a non-stick, preferably NOT Teflon, over med-high heat add a small square of real butter.
Saute shallot or onion for 3 minutes. Add Canadian bacon, cook 2-3 more minutes.
Add mushrooms and sun dried tomatoes, cook 3 more minutes.
Pour in eggs, let sit 1 minute. Using a rubber spatula, push eggs towards center of pan working your way around entire pan. Let sit 1 more minute, add chopped spinach, push towards center of pan again, repeat till just done, about 4 minutes.
Remove from heat, sprinkle with grated Parmigiana-Romano Cheese.
Serve with this healthy herb flavored crust.


Pizza Pie Crust:

1/2 cups rolled oats

1/4 cup sesame seeds
3/4 cups whole wheat flour
2 tablespoons dried Thyme
2 teaspoon salt
1 teaspoon baking powder
3 tablespoons extra virgin olive oil
1/3 cup tepid water


Preheat oven to 350F

Spread the oats and sesame seeds on a baking sheet and toast in the oven for 8 minutes. Transfer the toasted oats and sesame seeds to the bowl of a food processor fitted with a metal blade. Add the flour, thyme, baking powder and salt and process until the oats are finely ground.


In a medium bowl or Mixer, whisk together the water and oil. Mix in the dry ingredients to form a dough.
Roll out the dough on a lightly floured surface to 1/4 inch thickness. Place the dough onto a baking sheet. Cover with foil or damp towel and keep refrigerated for 30 minutes.

Remove from fridge, remove towel and bake in oven for 15-20 minutes till golden brown.

*save foil so you can cover the crust in the oven if it starts getting to brown


Read more ...

Wednesday, September 23, 2015

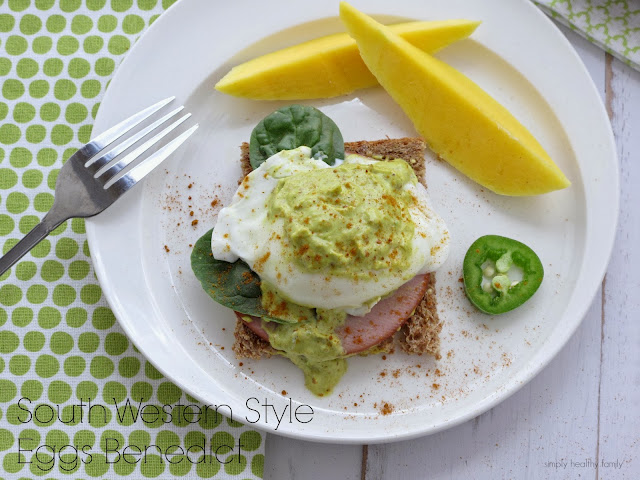
South Western Style Eggs Benedict with Creamy Avocado Hollandaise


Eggs Benedict has always and will always be my favorite breakfast. I'll never forget the very first time I had it in a little cafe in the Lamplight district in San Fransisco. It was the most indulgent breakfast I'd ever had and I was surprised at how much I looooved the warm, oozy yolk as it drizzled out of the egg and soaked into the toast. I have never been a fan of eggs in general and still don't care for boiled eggs or scrambled eggs unless made my way (pushed to the center of the pan till just cooked and with veggies). 


After this life changing breakfast in San Fransisco I did duly note how heavy my tummy felt and the slight but noticeable 'icky' feeling I get whenever I eat something that is loaded with fat. I came up with a much lighter version many years ago and have made it so many times now that it's my go to weekend breakfast or brunch. 


My simple starter Hollandaise is fat free by using plain, fat free Greek yogurt instead of mayo and egg and has plenty of 'bang for your buck' flavors going on. 


By adding half of a California avocado you'll get an even creamier texture, added flavor and super good for you fatty acids and vitamins.


To make the Hollandaise sauce appealing to the spice lovers palate, add 1/2 of a minced jalapeno and a dash of Spanish paprika or chili powder.


TIME  10 MINUTES        SERVES    4
Ingredients:

4 Organic, free range eggs
4 slices Canadian bacon
1/2 California Avocado
4 slices Ezekiel sprouted bread or English muffin
1/2 jalapeño, minced
dash Spanish paprika or chili powder
1/3 cup plain, fat free Greek yogurt
2-3 tablespoons whole grain Dijon mustard
dash of soy sauce or tamari
squeeze of lemon juice
1 teaspoon spice mix ~ make enough to save in a small jar for future use.
(equal parts: ground cumin, garlic powder, curry powder, turmeric, black pepper, cayenne powder)


 In a small food processor, mix together avocado, yogurt, Dijon, tamari, lemon and 1 teaspoon of the spice mix. Blend till smooth. You may need to add a tablespoon of water to desired consistency. Add the minced jalapeno and pulse a few times.

In a small pan add enough water to 1- 1/2" depth. Heat over medium-high heat till just  starts to boil.
Gently crack eggs, one at a time and slowly drop into water. Reduce heat to medium to maintain a very gentle boil. Cook eggs exactly 3 minutes. Using a slotted spoon, carefully remove eggs and place onto toasted bread with a slice of Canadian bacon (I like mine heated on a cast iron skillet).

Spoon the sauce over the the egg and bacon. Sprinkle with Spanish paprika and serve immediately.


Notes: Serve with mango, grapes, grapefruit or your favorite fruit.


This post is linked to Cookin Canuck  ~ Wake Up w CA Avocado


Read more ...

Thursday, September 17, 2015

Zucchini-Tomato "Tart" with Herbs and Parmesean


I'm not sure I can call this a tart. But Tart sure does sound cute if not fancy even. I don't have a tart dish. It's on my wish list....cursed wish list. Too much junk, who needs it? Really, other than looking fancy, one does not absolutely have to have a tart dish in order to make a tart of sorts.
In fact, I told my kids we were having zucchini PIE and they were thrilled! It worked out well, I had just a bit of dough left from my main dish and made the kids a " Cute little baby pie." Whatever works. ;-)


So a couple of things I learned when making this pie.
  1. The more shallow the pan/dish the better. I ended up having to use twice as many eggs as I wanted to and so it was more like a quiche than a tart. Not to mention it took about an hour to bake instead of 30 minutes. Look how deep my casserole dish is on the bottom of this post. Traditionally, tart pans are pretty shallow, plus they have pretty little ridges. ;-)
  2. When rolling out your crust try to get it as thin as you can. Mine was really yummy but pretty thick. So, more like a pie than a dainty tart. I added dried Thyme to my dough while mixing it and it was so wonderful! This was probably the best crust I've ever had! Ever.


adapted from Anja's Food 4 Thought

SERVES 6     TIME 15 MIN ACTIVE, 45 MIN BAKE
Ingredients:
Crust

1 cups rolled oats

1/4 cup sesame seeds

1 1/2 cups whole wheat flour

2 tablespoons dried Thyme

2 teaspoon salt

2 teaspoon baking powder

1/4 cup olive oil

2/3 cup water


Filling

3 zucchini, thinly sliced

3 tomatoes, thinly sliced

1 cup shredded Parmesan-Romano cheese- divided.

2 tablespoons fresh thyme, chopped

1/4 cup fresh basil, chopped

1 clove garlic, minced

1 tablespoon extra virgin olive oil

3 large Organic eggs

2 tablespoons low-fat milk

Salt and pepper to taste


-----------------------------------------------------------------

Preheat oven to 350F


Putting it all together:
Tart Crust

Spread the oats and sesame seeds on a baking sheet and toast in the oven for 8 minutes. Transfer the toasted oats and sesame seeds to the bowl of a food processor fitted with a metal blade. Add the flour, thyme, baking powder, salt, and pepper, and process until the oats are finely ground.

In a medium bowl or Mixer, whisk together the water and oil. Mix in the dry ingredients to form a dough.
Roll out the dough on a lightly floured surface to 1/4 inch thickness. Place the dough (folding in thirds if necessary for transfer) into the tart pan. Press it down evenly, making sure to fill in the fluted sides of the pan. Trim the tart of any excess dough. Cover with foil or damp towel and keep refrigerated for 30 minutes.
*save foil so you can cover the tart in the oven if it starts getting to brown


Tart Filling
Thinly slice the tomatoes and zucchini, I used my Kitchen Aide slicer attachment for the zuk.
In a large bowl, combine the zucchini with thyme, basil, salt, cracked pepper and 1 tablespoon extra virgin olive oil. Arrange the zucchini mixture in one layer onto tart crust. Sprinkle a layer of the cheese on top followed by one more layer of zucchini slices. Arrange the tomatoes on top of the second zucchini layer.

Whisk together the eggs and milk, add remaining cheese. Pour egg mixture evenly over the top and let it sink into the tart.

Bake the tart for 35-40 minutes. Let set for 10 minutes before serving.


PRINT THIS RECIPE
Read more ...

Friday, August 28, 2015

Roasted Summer Veggies with a Poached Egg, a 3 Olive Tapenade and Smoked Gouda with Bacon


Don't let the title fool you, this is a no brainer, super fast weeknight supper. 


I get asked quite often for ideas on simple, non-boring dinner solutions. Well, this is one of those meals. A new favorite in our home, this dinner can be easily modified to include your favorite veggies that you have on hand through out the seasons. If you've not tried a poached egg over veggies you're in for a treat. A simple olive and roasted pepper tapenade brings it all together with flare.


Can we talk about cheese for a minute?


Let me just say that if I had to live with just one food for the rest of my life it would be cheese.


O.K. maybe I'd need some fiber after a day or two but you get my drift. I also happen to be a cheese snob... and I'm o.k. with that. Growing up in the 80's I never knew cheese existed if it wasn't sliced and individually wrapped in plastic. Despite my limited exposure to real cheese in my childhood, I developed a unyielding fervor for good cheese,  I'm a cheese snob through and through. 


This smoked Gouda with bacon didn't stand a chance.  


Now, add a thin slice or two of  crispy bacon infused smoked Gouda with this dinner and sprinkle with a 3 minute olive tapenade.............


the end.


I don't like my veggies soggy or over oily (does anyone? Well maybe my in-laws who prefer their veggies boiled) I prefer them roasted or grilled which if you've never tried before, you must! It brings out an entirely new flavor. One of my top 5 favorite kitchen tools is my stone baking pan which you've probably heard me mention many times here on Simply Healthy Family.  It cooks veggies and treats evenly and crisply and requires very little to no oil. Healthy Bonus! I own both a Rada baking stone and a Le Creuset baking dish  both of which I adore. If you decide to purchase one, please do so through Simply Healthy Family's store and help support this blog. These are all items and foods that I own and love. 


You Will Need

2 zucchini squash, chopped
1 yellow summer squash, chopped
4 small red potatoes, chopped into bite size pieces
1 bunch asparagus OR pole beans, trimmed
1 teaspoon extra virgin olive oil
1 tablespoon Herbs de Provence (or 1/2 teaspoon each of marjoram, rosemary, thyme, tarragon and oregano)
salt and pepper to taste

6 whole, free range, Organic eggs
small shallow pot of gently boiling water (1 teaspoon vinegar optional, helps keep egg together)


For the Olive Tapenade

1/4 cup black olives
1/4 cup green olives
1/4 cup kalamata olives
{or use any combination you please}
1/2 cup (jarred) roasted red peppers
1 clove garlic
1/2 cup chopped or slivered almonds (or pine nuts or walnuts)
2-4 teaspoons olive oil (if you use red peppers in olive oil, you will need less additional oil)
NO salt, olives contain enough!


Pre heat oven to 400F. Place all veggies in your stone baking pan sprinkle with salt, pepper and herbs, toss to coat.  Put in oven and cook for 20-25 minutes or until potatoes are tender.

Meanwhile, make olive tapenade. In a small handheld food processor place first nuts then remaining ingredients. Chop to desired consistency. Spoon into small serving bowl.

Now, start a shallow pan of water to a gentle boil (over medium-high heat). Carefully crack eggs (one or two at a time if necessary so they don't crowd the pan. Gently boil for exactly 3 minutes. Remove with a slotted spoon onto a plate or directly on top of veggies.


Serve with the tapenade and a small slice of your favorite cheese, although I highly recommend the smoked gouda with bacon as it compliments the egg in this dish.


Read more ...

Friday, July 31, 2015

Beyond Broccoli! Swiss Chard and Herbed Feta Omelet with Sunflower Seeds


Today I felt very, very glamorous. Like a movie star even. I scrounged through my closet, dusting off slinky pieces of silken camisoles and scarves that haven't seen the light of day in more than a decade. I carefully picked through my single drawer full of make up for a shade of eye shadow and a tint of lip gloss that would make me look glamorous without making me look desperately like I was grasping on to my  twenties  for dear life.


Why do you ask would I put myself through such torture? Because I, Gwen Wilson had been generously offered to do an official photo shoot with a real, live, professional photographer who is used to shooting twenty-something models from L.A. California.

 My neighbor and friend, Ron Brewer who recently moved here from L.A. very graciously offered to take my son's senior pictures a few months ago at NO  cost. They  turned out so, so amazing and it is a gift that we will cherish forever. At the same time he offered to do a photo shoot of me which I had mixed feelings about. Mostly it sounded like a lot of fun and a great opportunity but really, who was I kidding?  What was I going to do with  a bunch of pictures of myself looking like a tired mom-of-four?


Deep breaths..... Nice.. Calm.. Deeeeeeep breaths.......

Say's Me to myself and I:

I am not too fat. 

I am not too old.

I AM  a confidant, fun, happy-go-lucky sort of girl who can and  WILL  embrace  all of life's adventures and opportunities at the drop of a hat and  GO WITH IT!


Here are a few shot's of Britton that Ron took.


Pretty cool huh?


I haven't even seen the final photos from my shoot yet but it turns out I had a  lot  of fun. I felt pretty. I felt glamorous. It was a far, far cry from the every day routine of  mommy-hood.


What does this have to do with Swiss Chard Omelets?

Nothing. Absolutely nothing.  Other than the fact that today was a good day followed by an even better dinner. A dinner that took about 10 minutes to prepare and cook and one that all 4 kids ate willingly and happily. A dinner that I could feel very good about serving to my family and eating myself. One that I know YOU  will love too.


Without further ado,


Swiss Chard and Herbed Feta Omelet with Sunflower Seeds:


Swiss Chard and Herbed Feta Omelet with Sunflower Seeds:
SERVES 4      PREP TIME    10 MINUTES     COOK TIME    5 MINUTES    


Ingredients:
8 eggs (figure about 2 eggs per person)
1 small bunch swiss chard
1 small green zucchini
2 cloves garlic
1/4 cup chopped green onion
1/4 cup Raw unsalted sunflower seeds
1/2 cup herbed feta cheese
1 tablespoon extra virgin olive oil
1 teaspoon cracked black pepper
1/2 teaspoon Himalayan Pink Sea Salt
Optional:
Diced avocado


Putting it all together:
Roughly chop swiss chard and rinse thoroughly. Chop zucchini into small pieces. Smash garlic and mince, set aside. Finely chop green onion, set aside.
Whisk together eggs, salt and pepper.
 In a large cast iron or caphalon skillet, over medium-high heat, add oil. When hot, toss in swiss chard, let sit for a minute. Toss with a spoon. Add zucchini and toss to coat, let sit so for a minute so it will brown. Add garlic and stir for 1 minute. Do Not let garlic burn!
Pour eggs into skillet. Let sit for 1 minute without stirring!
Push eggs towards center of skillet with flat spoon working your way around the pan.
Add feta. slowly keep pushing eggs towards center of skillet until just set.
Remove from heat. Garnish with green onions and avocado.


Don't forget the sunflower seeds! They are a strong source of Vitamin E, Magnesium and detoxifier.


Read more ...

Friday, July 24, 2015

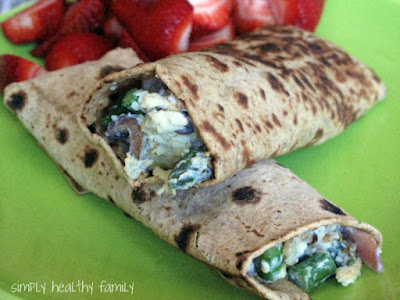
Focaccia Breakfast Rollups


These focaccia wraps were a very nice change from our usual breakfast. Usually we have something pretty simple, a.k.a,. fast for breakfast around here. When I do make something heartier on the weekends it's usually breakfast burritos or something of the like. I actually got this idea from a Starbuck's while Jim and I were out of town a while ago. They had a very simple, egg white, cheese ( i forget which kind) and spinach focaccia roll up. Of course these are much heartier, full of more veggies and of course way less expensive!


I was very happy with the result!
 You can't tell by looking at them, but the focaccia wraps were a very yummy change from tortillas


Ingredients:  (spinach or any of your fav veggies will work!)
Eggs, herbed feta, Leeks, mushrooms, Canadian bacon, asparagus, focaccia wraps,
 EVOO, Kosher salt, fresh ground pepper.


Putting it all together:

In a large non-stick skillet ( not teflon) heat 1 tablespoon EVOO over med-high heat.
Chop the white parts of the leeks and rinse very well in a collander.
 (leeks are roots and hide dirt in their layers)
Cut the ends off the asparagus and discard (about the bottom 1/4). Chop the remaining tops into thirds.
Add chopped bacon and asparagus to saute pan. Cook about 3 minutes.
 Add chopped leeks and chopped mushrooms. Cook 1-2 minutes more.
Meanwhile, whisk desired amount of eggs in a small bowl with 1 tabelspoon water and the feta.
Add eggs to saute pan, sprinkle with salt and pepper.
Using a rubber spatula, slide eggs towards center of pan, working your way around.
 Transfer ingredients to a bowl.
Wipe pan clean with a paper towel. Return to heat. Lower to medium heat and add 1 tabelspoon EVOO.
* I warm my focaccia in microwave for about 10 seconds to make them more pliable.
Fill  wraps with cooked ingredients.
Fold bottom of foccacia up and then sides, making an envelope with an open top.
Gently transfer to pan, folded side down. Cook about 1-2 minutes just to seal the wrap.

* Serve with fresh fruit!

**(always eat something RAW and a MUFA before/with your meals)


I just wanted to show you the folded/sealed side, not pretty I know ;-)


Read more ...

Wednesday, July 1, 2015

Chitarra alla Carbonara


My husband and I went to this restaurant, PastaBar, in downtown Phoenix several months ago. I can't stop thinking about their food. I'm not a huge pasta fan, but this place was awesome! It was a place I never would have walked into given that it has a very modest exterior and is tucked away from the mainstream downtown businesses. Thankfully, my husbands boss Janie, whom I adore, lives downtown and knows good food! She had taken her group, including my husband to the PastaBar for lunch and my husband said I would love it. The man knows me. ;-)  I was imediately in love with the romantic, quaint setting inside. I am in love with unique, good quality appetizers. PastaBar's appetizer menu was right up my alley. Luckily,  I found myself there a little early during happy hour, half price appetizers. Yay me!  I  had fun ordering a few delicious appetizers like their version of salad caprese/bruschetta was to die for; Buffalo Mozzarella, basil pesto, heirloom tomatoes, anchovies served on toasted baguettes. I also had a plate of local grown, assorted olives. Oh, and of course a glass of wine. 


Their philosophy at the PataBar is to use quality ingredients from Local farmers and ranchers which I love! Heirloom tomatoes, a wide variety of eggs, local honey, micro greens and herbs, lamb, apples and cider just to name a few.  I love it!

So, as I was saying. I really liked the idea of the Chitarra alla Carbonara, which literally translates to
"Guitar Pasta", not sure why.  Anyway, it is a freshly made pasta with tempered eggs and usually prociutto or pancetta crumbled throughout the pasta.While this pasta was very good, it was also very, very rich. So, I decided to try making a healthier version. I am very excited to say that it turned out fabulous! I had them add asparagus to mine and did the same at home. I just have to have my veggies! I'll bet they're making it that way now. ;-)

The key I believe is to use quality, fresh ingredients. Especially when it comes to the cheese and wine. I would have loved to use organic, fresh brown eggs but alas, I can not afford to. Also, be sure not to overcook your pasta or asparagus!!! This dish is all about fresh, summery crisp goodness. Also, this is FANTASTIC the next day cold!!!

Bon Appetit!


SERVES  8-10     TIME  20 MINUTES
Ingredients:

1 pound semolina spagetti
1 pound thin asparagus, cut into 2-inch pieces on an angle (discard the ends)
1/4 cup extra-virgin olive oil
1/4 pound Canadian bacon ( or Italian bacon such as prosciutto or pancetta)
4 cloves garlic, finely chopped
1/2 cup dry white wine4 egg yolks, beaten ( save the egg whites for an omelet in the mrng)
1 cup freshly grated parmigiano-reggiano cheese
2 tablespoons chopped fresh thyme
1 tablespoon lemon rind, grated in very thin strips


Directions:

Bring a large pot of water to a boil, salt it, add the pasta and cook until al dente.Drain, reserving 1 & 1/2 cups of the pasta cooking water.

While the pasta is boiling, in a large skillet, heat the EVOO over medium heat. Add the bacon and asparagus and saute for 3 minutes. Lower the heat to medium-low and stir in the garlic for 2 minutes.
Add the wine and deglaze the pan by scraping the browned bits off the bottom with a flat spoon or spatula. Cook about 1 minute until wine is reduced slightly. Don't over cook!! Do this part quickly so as not to overcook the asparagus. Lower the heat to the lowest setting. Add drained pasta, cheese, thyme and lemon juice. Gently toss to mix.

In a medium bowl, whisk together the still hot, reserved pasta cooking water with the beaten egg yolks to temper the eggs. Pour in the egg mixture and toss with two big spoons to thicken the sauce, 1 to 2 minutes.


Serve with a glass of chilled white wine!   Bellisimo!


Read more ...

Friday, June 5, 2015

Cauliflower Fried Rice with Spring Veggies and Chives


Weekday dinner just got exciting in a big way. If you like Chinese food you are going to love this healthy version of Fried Rice. It has all of the yummy components of traditional Fried Rice minus the rice. 


Rice is most likely a pantry staple in most homes used as a starchy side next to or with veggies and meat of some sort or as a 'filler' for a vegetarian meal. Debatably, rice, especially processed white rice really isn't a healthy food to eat and has several downfalls to it's few qualities. For instance, and I'll keep it super short so I don't bore you (more than I already am?) white rice has been waaaay over processed and completely stripped of any nutritional value, enough so that the FDA requires that it be "enriched" or "fortified" with vitamins and minerals.


Brown rice while a healthier option for it's vitamin content and fiber still has a few concerning negative qualities so I eat it vary rarely if at all any more.  Why?  Brown rice is very good at naturally 'leeching' non organic arsenic, found in pesticides and insecticides from the soil and water and is absorbed by rice as it grows. The inorganic form of arsenic, a toxin known to cause liver, lung, kidney and bladder cancer. I found this out when I tried substituting brown rice syrup for sugar several years ago and did some research. A lot of research. 


All rice, grains and nuts have large amounts of phytic acid in them. 
Phytic acid, the storage form of phosphorus,  is one of those pesky “anti-nutrients” the Paleo community keeps telling you to avoid. It’s often considered an anti-nutrient because it  binds minerals in the digestive tract, making them less available to our bodies. 

The process that produces brown rice removes only the outermost layer, the hull, of the rice kernel and is the least damaging to its nutritional value. The complete milling and polishing that converts brown rice into white rice destroys 67% of the vitamin B3, 80% of the vitamin B1, 90% of the vitamin B6, half of the manganese, half of the phosphorus, 60% of the iron, and all of the dietary fiber and essential fatty acids. Fully milled and polished white rice is required to be "enriched" with vitamins B1, B3 and iron. 


Buuttt......... 


White rice doesn't contain the phytate and trypsin inhibitor content of the less-milled brown rice and if you cook it properly (which neutralizes the haemagglutinin-lectin) you don’t have much to worry about as far as an anti-nutrient perspective. 

The debate goes on.... if you're interested in that sort of thing. 


Listen, eating rice is not going to kill you, quickly...... just kidding. However, I for one have decided that it's pretty much a super bland, super starchy (yeah, your body does need some starch to survive but there's starch in healthier foods out there) not so healthy food/filler to eat therefore, not worth it. 

Decide for yourself, I'm no expert. 


What I DO know for a fact is that eating more vegetables is a good thing. I for one can not get enough of them. Cauliflower is one of my favorite veggies although if you told me I would say that when I was 10 I would have thought you were craze-E! I've been using cauliflower in lots of dishes like these Chipotle Cheddar Poppers,  Buffalo Cauliflower 'wings' and even as a healthy, gluten free pizza crust!


It's really hard to tell that this is not rice, especially with a little bit of Tamari sprinkled on top but you can taste cauliflower so if your a hater this dish might not be for you. However, my kids never raised a skeptical eyebrow and happily gobbled this Cauliflower Fried Rice up.


TIME     30 MINUTES        SERVES    6


1 medium head of cauliflower, leaves removed and chopped

1 cup mixed frozen vegetables, rinsed and drained

1 small red bell pepper, diced into small pieces
2 tablespoons + 1 teaspoon sesame oil (for frying the cauliflower and egg)
4 large Organic, free range brown eggs, whisked

Fresh chives, chopped


Heat a large skillet over medium-high heat. 

In a large food processor or powerful blender, place half of the cauliflower florets. Pulse several times until you have a rice like consistency. Be careful not to over process or you will have mush! Scoop cauliflower 'rice' into a bowl and set aside. Do this to the remaining cauliflower. 

Pour sesame oil (not the toasted kind) into the hot skillet. Dump the cauliflower carefully into the skillet and spread it out evenly over the pan tossing to cover with the oil. Let it sit for a few minutes to brown and release some moisture. Add the red bell pepper toss once or twice and let it continue to 'fry'.  

Add the rinsed and drained veggies, stir to combine. 

Meanwhile,  heat a non stick pan over medium-high heat. Add sesame oil (not toasted) to pan and swirl to coat. Pour in the eggs. Using a silicone spatula push the eggs towards the center of the pan working your way around. Let them sit for 1 minute then repeat, pushing them towards the center of the pan working your way around. Do not overcook the eggs! You want them to be undercooked and slightly runny.  

Add the toasted sesame oil to the cauliflower, store to combine. Pour the eggs into the cauliflower and quickly fold them into the mixture cooking just 1-2 minutes more until eggs are just done. Remove from heat, serve in bowls piping hot. Garnish with tamari and chives.


resources 

Read more ...