Showing posts with label bananas. Show all posts

Monday, November 23, 2015

Pumpkin Pie Ice Cream with Gingersnap Crust Sprinkles


This simple and healthy ice cream is dairy free, super low in sugar and takes about 2 minutes to blend up ~ no churner needed. It is completely adaptable to your tastes by adding extras of your choice, chocolate chunk pumpkin ice cream anyone???


This month on Recipe Redux we are talking about Food Memories. It's funny how certain smells and tastes can sometimes have such an amazing affect on us. For me it's roasted, sugared pecans, freshly squeezed lemon aid, home made tapioca pudding and pumpkin. Those foods will always instantly transport me to my childhood. 


The winter Holiday's mean different things to different people depending on your life circumstances, where you grew up and what your traditions were. I grew up in the 80's and 90's in a close knit, middle class neighborhood with 2 younger sisters and a brother. No extended family lived nearby so Holidays were usually a small affair except for when we drove up to Salt Lake City to have a huge Thanksgiving at my grandma and grandpa's home. Fond times. 


Slightly sweet and very creamy this pumpkin pie ice cream brings fall flavors to the table without having to unbuckle your belt (or put on your mommy yoga pants) afterwards. 


What I remember most about our family of six's Thanksgiving is the home made pumpkin pie with freshly whipped cream. The smell is what always got me and while I am not a pumpkin pie lover, the smell of cinnamon, nutmeg and pumpkin is very nostalgic for me. 


Wait. Wuuuuut?  'You don't like pumpkin pie?!' you say.


Nope. Or most any pie for that matter except maybe cherry and apple. But I'd rather have it as a cobbler than a pie. As for the pumpkin pie aversion, I think it's a texture thing, too thick and mushy. I do however l.o.v.e. pumpkin. Pumpkin cookiespumpkin muffinspumpkin wafflespumpkin eggnog custard,  pumpkin granolapumpkin cinnamon rolls and even pumpkin stew. All of that, but my newest obsession is 


Pumpkin Pie Ice Cream. 


Holy raving nostalgic overload with a surprising twist factor. 


nostalgia |näˈstaljənə-|

noun


sentimental longing or wistful affection for the past, typically for a period or place with happy personal associations


HANDS ON TIME     2 MINUTES         TOTAL TIME 4 HOURS           YIELDS    4 CUPS 


Ingredients
2 cups canned or cooked pumpkin1 can of coconut milk or plain, fat free yogurt3-4 bananas, chopped and frozen1 teaspoon pumpkin pie spice mix1 teaspoon real vanilla (I sometimes use bourbon vanilla ;)1 cup crushed gingersnap cookiesOptional additionschocolate chipsnutscaramel drizzlecrushed graham crackers
In your blender place coconut milk, pumpkin, bananas, spices and vanilla. Blend on your frozen dessert setting (or on high) for 2 minutes. Pour mixture into a bread pan and place in freezer. Freeze for  3-5 hours depending on the 'frozeness' of your bananas, your freezer temperature and what size pan you use to freeze it in. 


Read more ...

Friday, July 3, 2015

Banana Split Popsicles {sugar free & healthy}


Inspiration for today's post comes from the fact that is 113F out and getting. even. hotter. The fact that it doesn't rain here in Phoenix makes me wonder how the hell so many idiots people decided to make this their home. It's a mystery..... and I'm Native..... idiot.


To make matters even more miserable, I work in the Operating Room aka meat locker (that didn't come out right). Meaning that we keep the AC around 59F-62F at all times and complain when it reaches 66.7F.  We are a strange group us medical people. So when I leave the perfectly normal frigid temps of the O.R. and walk outside into the blinding desert sun (no windows in surgery, could be an apocalypse and we'd never know) my internal body temperature starts to boil in exactly 13.2 seconds. Which is exactly how long it takes me to get to my car, open the door and step right into HELL, at 125+ degrees F.


Leather seats, wearing shorts, with no window shade, no parking garage, in Phoenix, in July. I'm all kinds of smart.


Eating a Banana Split on a stick = Very, very smart.


What I do have going for me are Popsicles. Granted I've seriously considered rubbing them all over my overheated face and body on more than one occasion. Desperate times, desperate measures.

Typically, light and fruity Popsicles or even frozen fruit are our only source of snacking and desserts here during the summer months but seeing as that it's a Major Holiday in July I decided to step dessert up a level.


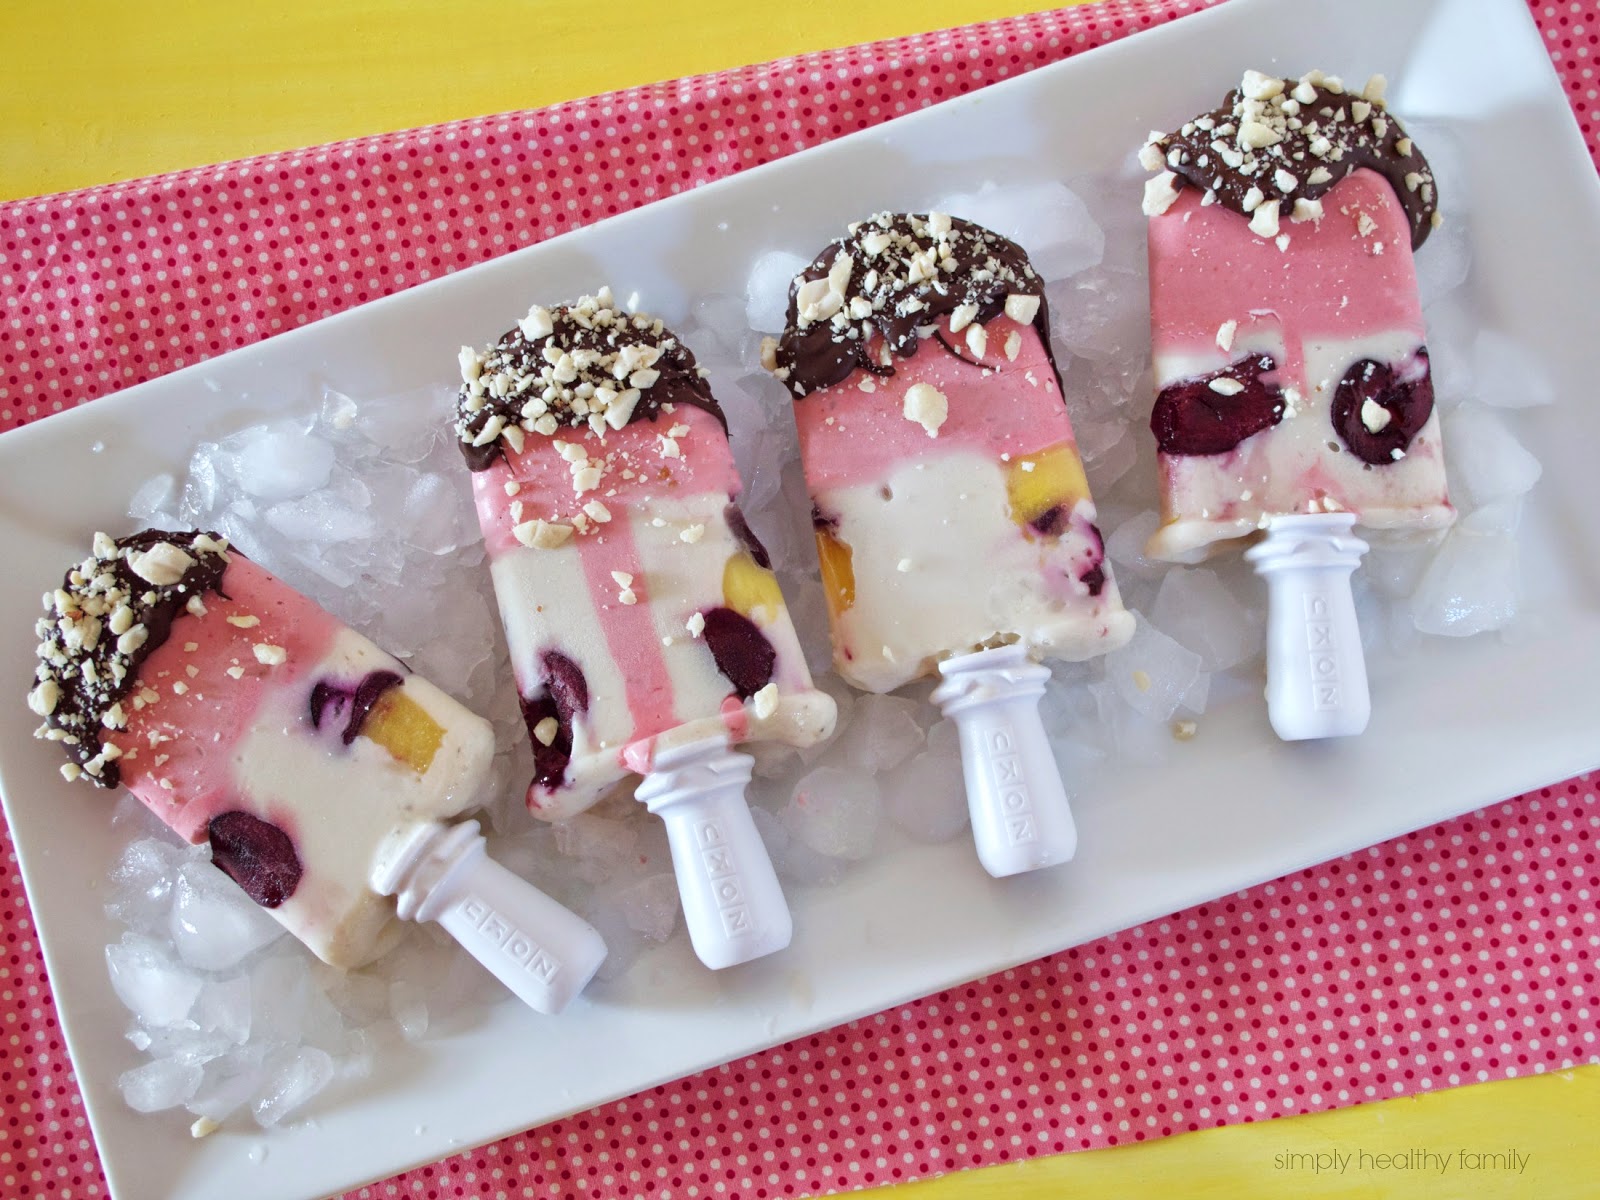
What's even better than a big Ooooey Goooey Banana Split? A Banana Split that is combined together, layer by layer and then frozen on a stick to slowly enjoy while you sit waist deep in your pebble tech, salt water pool. With your big, ridiculous floppy hat of course.


Strawberry, coconut puree, frozen bananas blended with vanilla almond milk and fresh cherries and pineapple in every bite. Drizzle with chocolate and sprinkle with chopped peanuts. 
Summer just got better. 


I learned a few things while making these Banana Split Popsicles,


  1. Making and attempting to photograph popsicles in July in Phoenix is a feat worthy of serious admiration. 
  2. Banana Splits in popsicle form are sheer genius that you can eat single handedly while sitting in the pool, no spoon required.
  3. I need a cherry pitter thingy-ma-jig.
  4. My mom just called me a lazy bum because I want a cherry pitter thingy-ma-jig. She's mean. 
  5. It's perfectly acceptable to dip fresh cherries and pineapple into melted chocolate before dinner while you are waiting 3-5 minutes in between popsicle layers to freeze. 


You will need

A ZOKU popsicle maker or other popsicle mold
2 cups fresh strawberries, greens removed, or not (I leave them on, lots of nutrients!)
1/2 cup coconut milk (in a can)
* tablespoon monk fruit in the raw
2 fresh bananas
1/2 cup vanilla (or plain) almond milk)
*1 tablespoon monk fruit in the raw
1 handful fresh cherries, pitted and cut in half
1 handful of pineapple tidbits
1 cup semi sweet chocolate, melted
1/2 cup chopped peanuts


To Make

In a blender, combine strawberries, coconut milk and monk fruit in the raw. Blend until smooth. Carefully pour into popsicle molds 1/4 deep. If using a ZOKU, wait 3 minutes till frozen then pour in the banana mixture. If using old fashioned popsicle molds, put in freezer until frozen, about 2 hours.
Rinse out strawberry puree from blender and then add bananas, almond milk and monk fruit in the raw. Blend until smooth. Drop a few cherries and pineapple tidbits into popsicle molds then carefully pour in banana mixture. If using a ZOKU, let freeze for a few minutes then remove and drizzle melted chocolate on top and sprinkle with chopped nuts. 


Need some more summer worthy snacks? I've seen some pretty delicious and perfectly picnic/4th of July worthy recipes from my blogging buddies such as:


Boozy (or not) Watermelon Stars


Red White and Blueberry Yogurt Pops from The View from the Great Island


Something super simple


These Fire Cracker Berry Margarita Floats from Half Baked Harvest!


And of course PIE! I know Apple Pie is an American Symbol of summer and picnics and even the 4th of July but I happen to l.o.v.e.  home made Cherry Pie the most.


Loaded Cherry Pie from Joanna at Eats Well with Others


Read more ...

Friday, June 26, 2015

Protein Packed Banana Sunflower Cookies gluten and sugar free


My baby is going to be 4 years old in a few weeks. I suppose that means I can officially no longer use the excuse that I am still trying to loose the baby fat. What's that you say? Most people say it only takes 6 months to a year at most to lose the weight after having a baby. Well then, I guess I better find another excuse for hanging onto the chubs like being almost 40=slow metabolism, being constantly busy with 4 kids and work.......

Alright, alright. Excuses suck and they don't create results so I'll  just have to suck it up and take matters into my own hands. Step it up a notch. Or two.


My chubby tummy is really starting to get on my nerves. The chubs have gots to go! I have been telling myself for almost 4 years, since aforementioned baby numero 4 that I will not buy new clothes until I lose at least 20lbs. 30 would be super.

The fact that my wardrobe is seriously out of style should tell you something. It's been way too long just waiting for the weight to come off. After I had my first 3 children I worked out once and a while, a few times a week usually hiking or playing tennis and sometimes home workouts when it was too hot outside. The wight came off fairly easily. So what happened after baby #4? This belly won't budge!


Taking matters into my own hands I decided to join a workout program along with a month of Shakeology with my long time fellow blogger and inspirational friend Jen aka The Fit Housewife.
I'm so excited to get started! My package should be on the doorstep any day now and I'll be on a 90 kick ass jump start to the new me with Chalean Extreme.


Getting motivated to workout isn't easy for me. Usually I have to tell myself to at the very least do a Yoga or 20 minutes of Pilates and after I do I'm energized and ready to kick it into gear with a tougher workout. Cute new workout clothes also are a great motivator so when Marni from ZUMBA Fitness offered to send me some of their new apparel I was more than happy to check it out.


I recieved this cute tank top which I loved! It wans't clingy which helps hide the tummy while I try to get rid of it. I really liked how airy it was, I hate when my clothes stay wet when I sweat. 


These sports bras would look great under their open back tanks!


 I like the sassy edgy quality of Zumba's line of comfortable workout clothes


Sporting my cute, new workout clothes and stocked with these healthy,
 protein packed pre-workout cookies I'm ready to get my cardio on!


These banana sunflower cookies taste like banana bread, my favorite!
Sweetened with a touch of honey and a handful of shredded coconut and made with
good for you gluten free flours minus the starch. I'm in love.


Oil free, butter free, refined sugar free, grain free. These still tasted wonderful. They have a cake like texture and the sunflower seeds added just the right amount of texture and heartiness, not to mention tons of beneficial vitamins and protein.


PREP TIME    10 MIN   
BAKE TIME    10 MIN
YIELDS    16-20 COOKIES 

Ingredients


3 ripe bananas

1/2 cup plain, fat free yogurt (or sugar free applesauce)
1/4 cup honey preferably local Organic, aides w allergies (eye it)
1/4 cup shredded, unsweetened coconut (or more honey)
1 cup spelt flour
1 cup buckwheat flour (or almond flour)
1 cup shelled, unsalted sunflower seeds
1 tablespoon baking powder
1 teaspoon baking soda
1/4 teaspoon iodized salt


Directions

Preheat the oven to 350°F. Coat a baking sheet with cooking spray.

In a large bowl, use an electric mixer on medium speed to cream together the bananas, yogurt and honey for 1 minute.

In a separate bowl, mix the flour with the sunflower seeds, baking powder, and baking soda. Add the flour mixture to the banana mixture along with coconut. Mix thoroughly to combine. 
Drop rounded tablespoons of the dough onto the baking sheet, placing them about 2" apart. Bake for 10-12 minutes, or until the edges are golden brown.


Sunflower seeds are an excellent source of Vitamin E,
 the body's primary fat-soluble antioxidant. Vitamin E travels throughout the body neutralizing free radicals which can reduce
 the
symptoms of asthma, osteoarthritis and rheumatoid arthritis, conditions where
free radicals and inflammation play a big role.
The minerals and vitamins in sunflower seeds also can greatly help reduce the severity of asthma, lower high blood pressure, and prevent migraine headaches, as well as reducing the risk of heart attack and stroke.


Sources
The World's Healthiest Foods


Read more ...

Sunday, March 15, 2015

Home Made Banana-Chocolate Crisp Granola Bars {and a Secret-Under Cover Give Away!}


I'm always thinking of healthy, home made snacks I can throw together for myself and the troops. I love a good snack that is loaded with good ingredients. One that will keep you feeling satisfied and energetic (not too energetic when it comes to the kids, there's a fine line...) and most importantly, one that is grab and go! Go. Go. Go. We are always on the run here; play dates, park outings, sports, practices, errand running, Dr. appointments and so on and so forth. There's nothing worse than being out and about with cranky hungry kids (and mommies) and having to go through a drive-thru or stop and a 'convienience' market for a processed, uber unhealthy, over priced snack. *yuchh! 

At the very least I try to grab a re-usable/home-made bag {snack bag} of mixed nuts and dried fruit and maybe some cheese sticks to take with me. Keeping a bag of mixed nuts in your cars center console will come in handy for emergency snacking and help you keep off that weight and save money! All good things in my book.

Then there's the issue of healthy school snacks. You know how I feel about that right?  Passionate.
I've mentioned my thoughts on sending processed and sugary snacks to school for my kids. It really, really isn't very hard to make home made granola bars, whole grain cookies or fruit bars. They come in so many forms your bound to find one that works for your family.

Also, again at the very least send fruit (yes, your kids will eat it if they are hungry and they know that holding out and whining will get them 'fruit' gummies or twinkies). Some of our favorite school and at home snacks are; Whole fruits, veggie medley with hummus or buttermilk-poppy seed dip,  mixed nuts and dried fruit, cheese sticks, Greek yogurt with pumpkin seeds and dried fruit, whole grain crackers with nut butter etc. These all work for you too! All are wonderful mid-afternoon pick-me-up's!


There are lots of  simple, school box friendly snacks for you right........ here on my blog. Go on, try one!

Let me know what you think and your favorite ideas for school snacks, I'd LOVE to know!


The secret to these granola bars is this cereal. It's very gently kissed with chocolate.
Who doesn't want to be kissed by chocolate?
I'm not talking about the 'other' chocolaty cereals that are loaded with sugar.
This brown rice cereal is just ever-so-slightly sweetened and a whole grain to boot.


Secret Under Cover Give Away!
O.K. If any of you can tell me what type of  plant I have dangling in the background I will send you TWO of my home made, super cute reusable snack bags! (pics coming soon)
 {To the first person with the correct anwnser!}


For the Banana-Chocolate Crisp Granola Bars


You Will Need:

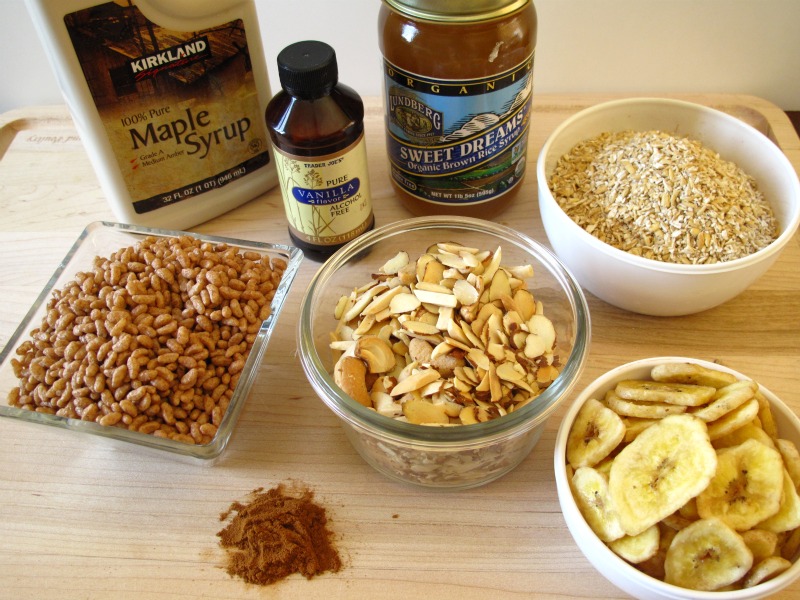
1 cup slivered almonds
1  cups cashews, coarsely chopped
1 cup banana chips, chopped
1 1/2 cups rolled oats (I use Coach's Oats)
1 1/2 cups {chocolate flavored} brown rice crisp cereal
* 1 cup brown rice syrup (sold at Whole Foods and other “natural” stores)
1/4 cup Grade B maple syrup
1 teaspoon cinnamon
1/2 tsp. salt
1 tsp. vanilla extract


Putting them together:

Preheat the oven to 350°. Spread the oats, almonds and cashews on a cookie sheet and toast them in the oven for  8-10 minutes, or until they start to brown a bit. Remove from oven and let cool.
In the meantime, line a 9 x 13 baking dish with parchment paper and set aside {can use butter or coconut oil}. Now, mix the rice cereal, banana chips and cinnamon in a big bowl. Add the oats and nuts once they’ve cooled.

In a small saucepan, heat the syrups, salt and vanilla extract over medium-high heat, stirring constantly to avoid burning. Once the syrups come to a gentle boil, continue to cook for an additional 3-4 minutes until the syrup begins to thicken, then pour it over the oats and nuts mixture. Mix everything together so that the syrup evenly coats everything in the bowl.

While it’s still warm, pour the contents of the bowl into your prepared baking dish. Using a rubber spatula, pat everything down so it’s nice and compacted (I did this again after about 10 minutes to make them nice and compressed). Let cool to room temperature. You can also put them in the fridge for a bit since this’ll make cutting easier.

Cut them into square or rectangles as you please.  Store them in a airtight container in the refrigerator.


recipe very slightly adapted from Bitchen Camero


*Brown Rice Syrup

 
* brown rice syrup = rice syrup = rice bran syrup = rice malt = yinnie syrup  

Notes:   Health buffs like this because it contains complex sugars, which are absorbed more slowly into the bloodstream.  It's about half as sweet as ordinary table sugar. Some rice syrups include barley malt, and may pose a problem for people with gluten allergies.  Substitutes:  maple syrup (substitute 3/4 cup plus 2 tablespoons liquid for each cup of brown rice syrup) OR molasses (substitute 1/2 cup for each cup of brown rice syrup) OR barley malt syrup (substitute 3/4 cup for each cup of brown rice syrup) OR honey (substitute 3/4 C honey plus 2 tablespoons liquid for every cup of brown rice syrup)
 
The Cooks Thesaurus


Like this post? Love my blog? Please vote for me
{Healthy Mamma}
It would mean the world to me!
Thanks!


Read more ...